Sweet Tamago Sushi: A Delightful Japanese Omelette Roll
Craving a taste of Japan? Let me show you how to make Sweet Tamago Sushi in 30 minutes! This fluffy omelette roll brings back sweet memories of my grandmother's kitchen. A perfect weekend treat!

Let's Talk About Sweet Tamago Sushi: A Quick look into into Yummy!
You ever just crave something that kind of makes your taste buds dance? oh my gosh, i have the perfect solution for that—a dish so delightful, you’ll feel like you're ordering takeout from the finest sushi bar without leaving your kitchen.
Yes, i’m talking about sweet tamago sushi! now, this isn’t just any recipe; it’s the kind that reminds you of warm family dinners and the homey smell of eggs frying.
If you've ever wondered how to whip up this flavorful japanese omelette sushi in under 30 minutes, keep reading!
The Dish You Didn’t Know You Needed
Sweet tamago sushi , also known as tamagoyaki , hails from the vibrant streets of japan. this dish dates back centuries, illustrating the artistry of japanese cuisine.
Tamagoyaki originated as a staple breakfast item, but it’s become a star at sushi bars everywhere. today, it’s a favorite not just for its taste but for the incredible range of tamagoyaki variations that allow you to switch things up!
Alright, let’s break it down. it’ll take about 30 minutes total—15 for prepping and another 15 for cooking. honestly, you’ll be surprised at how easy it is to master this fluffy omelette recipe.
It’s labeled as medium difficulty, but don’t let that scare you! if you can whisk eggs, you can totally do this.
Plus, it’s wallet-friendly! you’ll get two servings out of pretty simple ingredients—win-win!
Why This Recipe Rocks
Now, time to talk about the real perks of making this luscious dish. zing into the conversation about health benefits —eggs are loaded with protein, and when combined with sushi rice, you're getting a solid meal packed with energy.
The nutritional benefits of sushi generally make it a healthier option compared to other quick meals.
Another cool thing? sweet tamago sushi is super versatile. it fits perfectly into brunch spreads or as adorable bite-sized sushi snacks during parties.
Kids love it, adults rave about it...it's the kind of dish that makes you the star of any gathering.
And honestly, who doesn’t love a little sweet twist with their typical savory fare?
Bonus time: when you’re making homemade sushi , you get to control all the sushi essentials , from soy sauce to the rice vinegar recipes we'll cover later.
Home cooking means less sodium and better flavors tailored just for your palate!
From Sushi Rice to Tamago, Here’s What You Need
Now let’s gear up for the exciting part: the ingredients and tools you’ll need. i’ll walk you through everything to make it smooth as that fluffy omelette .
However, before jumping into all that, just know: you’re gonna impress everyone with this recipe. your friends are gonna ask, “did you order that from the sushi shop?” and you’ll just smile and say, “nah, i whipped it up right at home!”
Just remember, this isn’t just about cooking; it’s about diving into a piece of Japanese tradition and enjoying a meal that’s sweet, comforting, and brings everyone together.
So grab your spatula and let’s get ready...because soon you’ll know exactly how to make Sweet Tamago Sushi in 30 minutes . Are you ready to roll? Let's go!
Essential Ingredients Guide for Sweet Tamago Sushi
Oh my gosh, if you’ve ever had a craving for sushi but found making it super intimidating, you’re in for a treat! let’s dive into my essential ingredients guide, so you can make sweet tamago sushi in 30 minutes with confidence.
Seriously, this easy tamagoyaki recipe brings together the best of sweet and savory flavors.
Premium Core Components
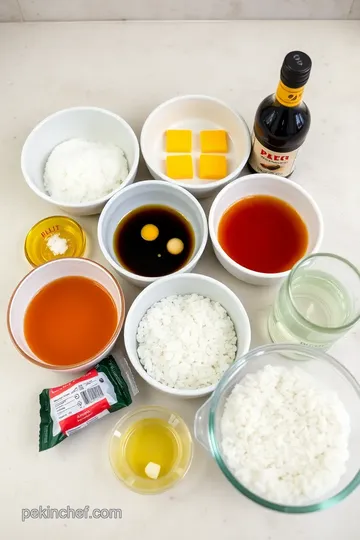
First, let’s talk about those must-have ingredients. the list is pretty short, but each component has its role. for the sweet tamago , you’ll need 4 large eggs (240 ml) , 2 tablespoons sugar (30 g) , 1 tablespoon soy sauce (15 ml) , and 1 tablespoon mirin (15 ml) .
The sugar gives it that delightful sweetness, while the soy sauce adds a little umami pop!
When picking your eggs, look for the freshest ones – they should feel heavy and have a smooth shell. always check the expiration date before you toss them in your cart.
And trust me, freshness tips ? go for organic if you can! you’d be amazed how much the taste gets elevated.
For storage, keep eggs in their original carton in the fridge to prevent them from absorbing odors. The shelf life is about 3-5 weeks, so use them up!
Signature Seasoning Blend
Now, onto seasonings! your tamagoyaki will be rocking a classic blend with soy sauce and mirin, but let’s explore a bit.
Besides the essential spices, consider adding rice vinegar (like 2 tablespoons for sushi rice ) and maybe a hint of sesame oil for some nutty goodness.
Feeling adventurous? You can try different herbs, too! Chives or scallions mixed into your egg can create a vibrant spin on this traditional Japanese omelette sushi. Totally worth it, am I right?
Smart Substitutions
So, what if you’re out of something or need to make dietary modifications? no worries! if you can’t find mirin, a mix of white wine and sugar works great.
If you need a gluten-free version, swap out soy sauce for tamari.
And if you’re cooking for those who can’t have sugar? try using honey or agave syrup. honestly, cooking is all about flexibility.
It’s not just about following strict rules; it’s about making it your own.
Kitchen Equipment Essentials
Before you start whipping up this easy tamago sushi , you'll need some key tools. you're gonna want a non-stick frying pan for a smooth cooking experience.
If you're on a budget, you can substitute with a regular frying pan – just add a bit more oil.
You'll also need a bamboo sushi mat if you're rolling it up – but hey, it’s not the end of the world if you don’t have one! a clean kitchen towel works too, just as effective for shaping.
To prepare your sushi rice, a rice cooker is super handy, but a simple saucepan works wonders too. be sure to follow those steps for how to make sushi rice .
After all, perfectly cooked rice is half the battle!
Wrapping it Up Before You Roll
Now that you’ve got the essentials down, you're all prepped for action. The unison of those sweet and savory flavors in Sweet Tamago Sushi is about to make your taste buds dance! Plus, who doesn’t love creating these adorable bite-sized sushi snacks?
And just think, this dish isn’t just a hit alone; it pairs beautifully with a warm bowl of miso soup or a cup of green tea for an authentic dining experience.
You’ve got this, my friend!
Next, let’s get into the fun part — crafting that gorgeous sushi roll together. Grab your ingredients, and let’s start cooking up something delicious! Trust me, it's way easier than it looks.
Unveiling the Art of Sweet Tamago Sushi
Alright, friends! today, we’re diving into the delightful world of sweet tamago sushi . this gem from japanese cuisine is also known as tamagoyaki , and let me tell you, it’s a total game-changer.
Imagine a fluffy, sweetened omelette rolled over perfectly seasoned sushi rice. seriously, if sushi were a superstar, this would be it!
Essential Preparation Steps: Mise en Place Done Right
Before we get cooking, let’s chat about mise en place . it’s just a fancy way of saying “have everything ready.
” break out your tamago sushi ingredients , which include eggs, sugar, soy sauce, and mirin. measure them out and have them waiting for you.
Trust me, this makes things way easier and helps you avoid kitchen chaos.
Next up, let's tackle time management . You want to make Sweet Tamago Sushi in 30 minutes flat, right? So, set a timer for each step. This keeps you focused.
Also, organize your workspace! have your pans, utensils, and bamboo sushi mat within reach. it helps avoid that mad dash for a spatula halfway through cooking.
And don’t forget about safety! keep hot pans away from the edges of your counter to prevent any spills.
Step-by-Step Process: Let’s Get Cooking!
-
Prepare the sushi rice : first, rinse 1 cup of sushi rice until the water runs clear. combine it with 1 ¼ cups water and cook it up.
If you’re using a rice cooker, follow its magic. if a stove is more your jam, bring to a boil, reduce the heat, and let it simmer covered for 18- 20 minutes .
Afterward, let it stand for 10 minutes off the heat.
-
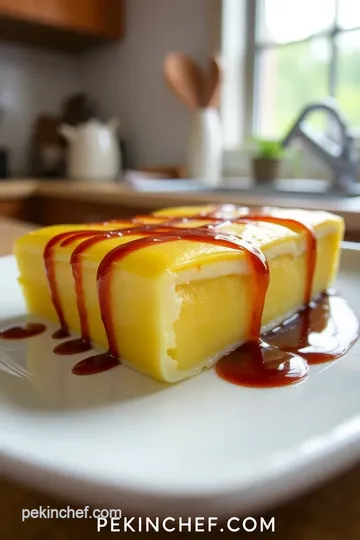
Make the sweet tamago : in a bowl, whisk together 4 eggs, 2 tablespoons sugar, 1 tablespoon soy sauce, and 1 tablespoon mirin until everything’s combined.
Heat a non-stick pan over medium-low heat, adding 1 teaspoon of vegetable oil. pour in a thin layer of egg mixture and let it cook until the edges start to set (about 2- 3 minutes ).
Flip it over gently, and slide it to one side of the pan. repeat until all the eggs are cooked! you’ll end up with a lovely thick roll.
-
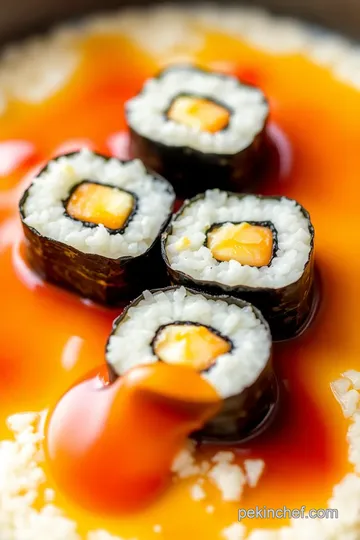
Assemble the sweet tamago sushi : here’s where the magic happens! lay a sheet of plastic wrap on your bamboo mat, and spread a layer of sushi rice over it.
Place the rolled omelette at one end and roll it all tightly. slice into those beautiful bite-sized pieces.
Expert Techniques: Making It Perfect
Let’s take a moment here. the key to the ultimate tamagoyaki recipe is temperature control. if your pan is too hot, you risk burning your omelette.
Keep it on low heat and slow and steady wins the race . and trust me, a fluffy omelette recipe requires lots of whisking to trap in that air and fluff it up.
While rolling, use your silicone spatula to gently guide the omelette, letting the uncooked egg flow underneath. This way, you build those fabulous layers.
Success Strategies: Avoiding Rookie Mistakes
Here’s my confession: I’ve overcooked my eggs more times than I can count. Avoid that! Keep an eye on your cooking time and make sure to keep the heat low.
When it comes to serving, try not to skip those little details. a touch of pickled ginger and wasabi really elevates this dish.
And, hey! if you’re in the mood for some sushi side dishes , a warm bowl of miso soup pairs perfectly with your sushi.
Conclusion: Savor the Delight of Tamago Sushi
So, now that we’ve got everything down, you’ll be rolling out your homemade sweet tamago sushi like a pro. it’s a wonderful way to impress your friends or just enjoy a cozy meal at home.
And remember, practice makes perfect. don’t worry if it doesn’t look picture-perfect the first time!
If you’re craving more tips on Japanese cooking or how to seamlessly roll that sushi, stay tuned for the next section, focusing on Additional Information about sushi essentials and techniques!
Pro Tips & Secrets for Sweet Tamago Sushi
Alright, friends, if you're diving into the art of making sweet tamago sushi in 30 minutes, you’re in for a treat! this dish is not only a classic but also super versatile.
Here are some of my pro tips and secrets to elevate your tamagoyaki experience!
First off, timing is everything . when whipping up that fantastic fluffy omelette, keep your heat low. if you crank it up too high, you might end up with something that resembles a rubbery dinner tire.
Not cute, right? take it nice and slow—let the eggs do their thing! a good non-stick pan is like your best friend in this process.
Trust me; you’ll thank me later.
Next, let's talk flavors. for that extra oomph, add a pinch of salt or dashes of soy sauce . it elevates the sweetness and brings a little savory magic to the table.
Have you ever tried adding some green onions or sesame seeds to your egg mixture? total game changer.
Perfect Presentation: Plating Like a Pro
When it comes to sushi, it’s not just about the taste—it’s all about the eye candy too! you want your sweet omelette roll looking as good as it tastes.
Think about the colors on your plate. use fresh cucumber or avocado slices as a side. and don’t forget about garnish! a sprinkle of sesame seeds or even some edible flowers can really elevate your sweet tamago's look.
Plating is an art. use a clean white plate ; it showcases your sushi and makes those vibrant colors pop.
Try to slice the sushi into tidy, even pieces. a sharp knife is crucial here; it gives you those clean edges and keeps everything together nicely.
Remember the golden rule: first impressions matter, even for sushi!
Storage & Make-Ahead
Alright, so maybe you made a little too much (can there really be such a thing?). here’s how to store your sweet tamago sushi.
Wrap it tightly in plastic wrap or put it in an airtight container, and it’ll stay fresh in the fridge for about 2 days.
Reheat gently in a pan on low heat if you want to warm it up, but don't go microwaving it; it’ll ruin the texture.
If you’re planning an epic sushi night, you can totally prep the sushi rice in advance . just keep it cool, and make sure to fluff it up a bit before rolling when you’re ready to serve.
Creative Variations
Feeling adventurous? this tamagoyaki is just the starting line! you can go nuts with creative variations . want to make a savory version? skip the sugar and toss in some chopped veggies instead! think scallions or grated carrots for a bit of a crunch.
If you're in the mood for something spicy, trying mixing in some sriracha or incorporating chopped jalapeños. Play with the flavors until you find that sweet spot – or should I say sweet and savory balance!
Complete Nutrition Guide
Now, let’s get a bit health-conscious. this sweet omelette is not just delicious; it packs a punch! a couple of pieces contain about 320 calories, with 12g of protein —not too shabby for a sushi snack! pair it with miso soup and some fresh veggies for a nutritious meal.
And for those keeping an eye on carbs or sugars, you can tweak it a bit. swap cane sugar with honey or adjust your rice portions as you see fit.
Expert FAQ Solutions
Got questions? you’re not alone! a common one is, “why is my tamagoyaki not staying rolled?” well, it’s all about gently folding and rolling as you go.
If you start tearing, don’t stress—just roll it up in layers. you’ll still get that tasty sweetness.
Another frequent dilemma: “How to get that perfect egg color?” The trick? Keep that heat low and use fresh eggs.
Wrapping It Up
So, there you have it! now you’re officially prepared to make sweet tamago sushi in 30 minutes like a pro.
Whether you’re cooking for a fancy date night or a chill sunday brunch, this fluffy omelette sushi is bound to impress.
Just remember, cooking is about experimentation and having fun! keep trying new things, and don't sweat the small stuff. happy sushi rolling!
Sweet Tamago Sushi: A Delightful Japanese Omelette Roll Card

⚖️ Ingredients:
- 4 large eggs (240 mL)
- 2 tablespoons sugar (30 g)
- 1 tablespoon soy sauce (15 mL)
- 1 tablespoon mirin (15 mL)
- 1 teaspoon vegetable oil (5 mL, for cooking)
- 1 cup sushi rice (200 g)
- 1 ¼ cups water (300 mL)
- 2 tablespoons rice vinegar (30 mL)
- 1 tablespoon sugar (15 g)
- 1 teaspoon salt (5 g)
🥄 Instructions:
- Step 1: Rinse sushi rice under cold water until water runs clear.
- Step 2: Combine rinsed rice and water in rice cooker or saucepan.
- Step 3: Cook according to rice cooker instructions or bring to a boil, reduce heat, cover, and simmer for 18-20 minutes.
- Step 4: Remove from heat, let stand covered for 10 minutes.
- Step 5: In a small bowl, whisk rice vinegar, 1 tablespoon sugar, and salt until dissolved.
- Step 6: Gently fold the vinegar mixture into the cooked rice until combined.
- Step 7: In a bowl, whisk together eggs, 2 tablespoons sugar, soy sauce, and mirin until well combined.
- Step 8: Heat the non-stick pan over medium-low and add vegetable oil, spreading it around the pan.
- Step 9: Pour a thin layer (about 1/4 of the egg mixture) into the pan.
- Step 10: Cook until the edges begin to set (2-3 minutes), then gently fold over using a spatula.
- Step 11: Slide the rolled omelette to one side of the pan.
- Step 12: Add another layer of the egg mixture, lifting the rolled omelette to allow uncooked egg to flow underneath.
- Step 13: Repeat until all egg mixture is cooked, forming a thick omelette roll (approximately 4 layers).
- Step 14: Place a sheet of plastic wrap on a bamboo mat (or clean surface).
- Step 15: Spread a layer of sushi rice over the plastic wrap.
- Step 16: Place the sweet tamago roll on the edge of the rice.
- Step 17: Roll tightly using the bamboo mat, shaping the sushi.
- Step 18: Slice the sushi roll into bite-sized pieces and serve.
Previous Recipe: How to Sear Beef Wellington for a Joyful Feast: The Ultimate Guide
Next Recipe: How to Make Grill Shrimp Arugula Salad Delight: An Amazing Summer Recipe