Ultimate Hand-Tossed Pizza with Flavorful Sauce
Craving a delicious family pizza night? Learn my secrets to crafting the ultimate hand-tossed pizza with a flavorful tomato-basil sauce from scratch!

Oh my gosh, do you remember the first time you tried making pizza from scratch? i do! i was in college, feeling like a chef after watching one too many cooking shows.
I dusted off my mom's old rolling pin, threw on my favorite apron, and got to work. let me tell you, i had flour flying everywhere and a doughy mess that didn’t quite resemble pizza.
But after a few trials (and a few mishaps), i discovered the joys of hand-tossed pizza with flavorful sauce . trust me; there’s something magical about crafting your own pie, topping it just how you like it, and sharing it with friends or family on a cozy pizza night at home.
Making pizza is more than just a meal; it’s an experience. from the tomato-basil sauce to that ideal crispy pizza crust , every step has its charm.
If you’re ready to dive into this adventure, let's take a peek at what this pizza journey entails!
Recipe Overview
Good pizza has roots that run deep. originating from italy, this pie has made its way into hearts (and stomachs) around the world.
In america, the pizza scene is vibrant and diverse, bursting with unique styles—from chicago deep dish to new york slices.
But nothing beats the joy of a hand-tossed pie made at home .
Now, let’s talk about timing . this isn’t a throw-it-in-the-microwave kinda meal. you’ll need about 1 hour total . that includes 30 minutes of dough resting time and about 15- 20 minutes of cook time.
It sounds like a commitment, but i promise it’s worth every second. as for skill level? it's medium . you might need to practice the hand-tossed pizza technique , but i know you can do it!
Now, let's chat money. this isn’t going to break the bank. you can whip up two large pizzas that serve about 4-6 people for a fraction of what you'd spend at a pizzeria.
Plus, you have control over custom pizza toppings . win-win, right?
Key Benefits
You might be wondering why to choose this pizza over the frozen kind or takeout. well, for starters, let’s get real: homemade pizza has some serious health benefits .
You control the ingredients. want less salt or fresher toppings? go for it! using fresh basil garnish and quality ingredients like san marzano tomatoes can elevate the dish nutritionally.
Plus, nobody can beat that authentic italian pizza vibe when you pull that perfect pie from the oven. you know the feeling—warm, cheesy, and oh-so-comforting.
It’s the ultimate italian comfort food , and who doesn't need a little comfort these days?
This pizza is also great for special occasions. whether it's a fun family pizza night , a kids' party, or just a cozy evening in, it’s sure to impress.
And don’t worry about making it look perfect! there’s beauty in the imperfections of traditional pizza making—so embrace it!
So, are you ready to get started? I promise the kitchen fun is about to kick off! Next up, let’s dive into the essential ingredients you’ll need to create that perfect hand-tossed pizza magic!
Essential Ingredients Guide for Homemade Pizza
Hey there, pizza lovers! if you’re planning a fun family pizza night , you’ve come to the right place. making your ultimate hand-tossed pizza with flavorful tomato-basil sauce at home is super rewarding and oh-so-delicious.
It’s all about the right ingredients and a sprinkle of love. let’s dive into what you'll need to whip up this masterpiece!
Premium Core Components
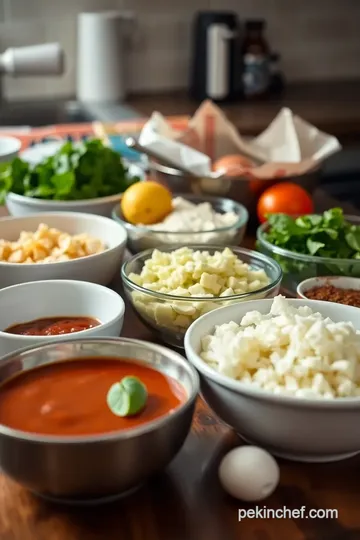
When you're tackling that juicy pizza dough recipe , pay attention to your core ingredients . Here are the essentials with some tips for storage and quality indicators.
-
Flour : go for 4 cups (480 g) of all-purpose flour . you want it to feel soft and fine. store in a cool, dry place, and it should last for about 1 year .
-
Yeast : active dry yeast is your best friend. 2 teaspoons (7 g) will work wonders in making your dough rise.
If your yeast doesn't bubble when activated in warm water, toss it and start fresh.
-
Water : Use 1 ½ cups (360 ml) of warm water . The temperature should be between 110° F ( 43° C) —too hot and you'll kill your yeast!
-
Olive oil & salt : fresh olive oil adds that rich flavor while the salt enhances all the tastes. use 2 tablespoons (30 ml) of olive oil and 2 teaspoons (10 g) of salt.
-
Tomatoes : for the sauce, nothing beats san marzano tomatoes . just one can (28 oz / 794 g) will transform your sauce.
They should smell fragrant and be bright red when you buy them!
Signature Seasoning Blend
Now, let’s sprinkle some magic on our pizza. The right seasoning blend can elevate your pizza from basic to downright sensational!
-
Herbs : you can't forget the italian herb flavors . a mix of 1 teaspoon (5 g) dried oregano and 1 teaspoon (5 g) dried basil will give your sauce that authentic taste.
-
Aromatics : A couple of minced garlic cloves really kick the flavor up a notch. Sauté them in 2 tablespoons (30 ml) of extra virgin olive oil—it’s heavenly.
-
Red Pepper Flakes : A ½ teaspoon (3 g) adds just the right amount of kick. Adjust as needed if you're feeding the kiddos!
Smart Substitutions
Here’s where it gets fun— substitutions ! If you find yourself missing an ingredient, fear not.
-
Flour : In a pinch? Bread flour can replace all-purpose for a bit more chewiness.
-
Tomatoes : No crushed tomatoes? Go for diced ones, just blend 'em up a bit before adding to your sauce.
-
Dairy-Free : If you're looking to create a dairy-free pizza, plant-based cheese or simply load it up with veggies can do the trick!
Kitchen Equipment Essentials
When you think about making your homemade pizza, having the right kitchen utensils saves you a lot of time and hassle. Here’s what you’ll definitely need:
-
Mixing Bowl : A large one to combine all your ingredients easily.
-
Dough Scraper : This is my lifesaver for kneading and scraping dough without a mess.
-
Baking Stone : For that crispy pizza crust you crave, preheat your baking stone for at least 30 minutes at 475° F ( 245° C) .
-
Rolling Pin : While I love the hand-tossed pizza technique , sometimes you just gotta roll it out!
So now that we’ve got our ingredients and tools lined up, you're ready to take that next step toward crafting your own hand-tossed pizza with flavorful sauce .
Remember, it’s all about fresh ingredients and a little bit of practice. with these tips in your back pocket, you’ll be the pizza hero of your culinary adventure!
Next up? Let’s dive into the step-by-step instructions to bring this beauty to life!
Crafting the Perfect Hand-Tossed Pizza with Flavorful Sauce
Let’s talk about something that brings pure joy to every pizza lover's heart— homemade pizza ! honestly, there’s nothing quite like the aroma of freshly baked pizza wafting through your kitchen.
It’s a vibe! this ultimate hand-tossed pizza with flavorful tomato-basil sauce recipe is the ticket to pizza night bliss!
Essential Preparation Steps
Before diving into the fun part (that’s the toppings, duh!), let’s nail down some essential steps. first up, mise en place .
It’s just a fancy way of saying, “get your ingredients ready.” trust me, this makes cooking way smoother. measure out your 4 cups of all-purpose flour , your 2 teaspoons of active dry yeast , and so on.
It’s less about being professional and more about being organized, you know?
Now, time management is key. i’m talking about the 30 minutes of dough resting time while you chill out and sip a drink—and maybe sneak a little taste of that sauce.
Every second counts! get your kitchen cooking utensils in order so you aren’t frantically searching for a spoon mid-dough-knead.
Safety first, my friend! if you’re using a baking stone for pizza , make sure it’s preheated to 475° f ( 245° c) .
This prevents that sad, soggy crust . we only want crispy pizza crusts, am i right?
Step-by-Step Process
Alright, let’s break it down step by step.
-
Make that dough : combine 1 ½ cups of warm water (about 110° f / 43° c) , a teaspoon of sugar , and yeast .
Let it froth for about 5- 10 minutes . then mix it with your flour and salt, knead it for 8- 10 minutes , and let it rise for 30 minutes .
It's like giving your dough a power nap!
-
Craft the sauce : heat 2 tablespoons of olive oil in a saucepan, then toss in 2 minced garlic cloves for just a minute.
Add in those 28 oz of crushed tomatoes (go for those san marzano tomatoes if you can—they’re legit) and your herbs.
Simmer it for 15- 20 minutes until it’s fragrant.
-
Oven Time! : Preheat your oven and keep your pizza stone in there for that all-important 30 minutes . Hot oven = happy crust.
-
Shape the Dough : Punch down your risen dough (frustrations, am I right?) and divide. Roll it out or toss it like a pro. Just remember to keep it 12-14 inches wide.
-
Assemble the Whole Pizza Magic : Spread your glorious sauce over the dough and pile on those custom pizza toppings galore! Cheese, fresh basil—whatever floats your boat.
-
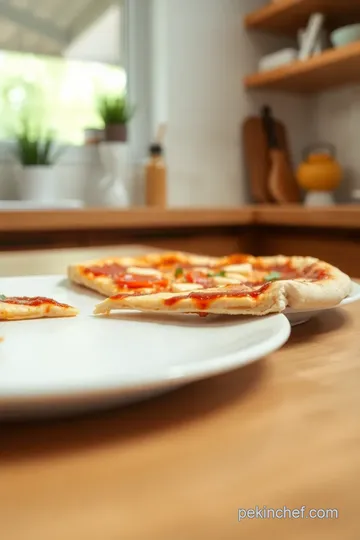
Bake, baby, bake : slide your pizza onto that hot stone and bake for 12- 15 minutes . you want the crust golden and the cheese bubbling like it's a pizza party.
-
Serve it Up : Garnish with fresh basil leaves and let it cool a tad. Sorry, no one likes pizza burns.
Expert Techniques
Let’s get real here. some pro tips can make a huge difference. always focus on timing precision ; don’t keep your pizza bakes in longer than suggested.
Keep an eye out for those beautiful visual cues—golden edges and bubbly cheese tell you it's ready to party!
Quality checkpoints are crucial. If your sauce tastes a bit flat? Add a pinch of salt. If your dough feels too sticky? Dust with flour and go for it!
Success Strategies
We’ve all been there. The dough didn’t rise, or it turned out tough. A common mistake? Over-kneading—just stop when it’s smooth, promise?
For pizza night essentials , always have some extra sauces and toppings on hand. maybe a little garlic aioli for dipping, or a zesty side salad to balance out the pizza feast.
And remember, you can make your dough ahead of time. it stores well in the fridge for about 48 hours , so you can have a spontaneous pizza night whenever!
As i reminisce about many a pizza evening with friends and family, it’s moments like these that remind me: homemade pizza isn’t just about the food—it’s about the connection, the laughter, and the unbeatable vibe of italian comfort food right at home.
Looking to explore more about pizza? Check out our additional tips and tricks for making your pizza night the best it can be!
Pro Tips & Secrets
Hey there, pizza lovers! are you ready to dive into the magical world of hand-tossed pizza with flavorful sauce ? let me share some secrets that your favorite chef passed on to me.
First off: allow your dough to rest . seriously, a good dough resting time makes a world of difference. it relaxes the gluten, and trust me—it’ll help you achieve that perfect stretch!
If you're looking to save some time, consider making your pizza dough recipe in bulk. you can easily freeze the extra dough! when pizza night rolls around, you've got a head start.
And for an easy pizza recipe , check this out—pop your pizza sauce on earlier, then let it simmer. this enhances the flavors big time.
Oh, and if you're all about that crispiness, don't skip that baking stone—preheat it for at least 30 minutes to get that crispy pizza crust we all crave.
Perfect Presentation
Here's where the fun begins! plating your pizza is like art, and no one wants a boring pie at dinner, right? a sprinkle of fresh basil garnish is a classic move.
It not only adds a pop of color but also that delightful italian herb flavor. i mean, who wouldn’t want to dig into a pizza that looks as good as it tastes?
Try experimenting with color, too! arrange your toppings in a way that complements each other. think about that deep red of tomatoes contrasting with the white gooey mozzarella.
Play with texture as well—use crispy toppings like bell peppers for a crunch. honestly, if your pizza is instagram-worthy, it tastes better—fact!
Storage & Make-Ahead
Listen up, pizza preppers! you can totally make this ahead of time and save it for busy nights. store your raw pizza dough in an airtight container in the fridge, and it'll be good for about 3 days .
If you're freezing, wrap it tightly in plastic wrap first. as for your assembled pizza, you can cover it in foil and keep it in the refrigerator for a day before baking.
When reheating, the oven is your best friend. toss that leftover slice in at 400° f ( 200° c) for about 10 minutes .
This restores that crispy texture that microwaves just can’t seem to recreate.
Creative Variations
Let’s get creative! the beauty of homemade pizza is its versatility. if you’re feeling adventurous, try different sauces—how about a flavorful marinara sauce for a twist? or maybe a creamy white sauce with spinach? and seasonal toppings are a must! in the fall, i love piling on roasted pumpkin and sage.
In the summer? go for fresh, local veggies like zucchini and tomatoes!
You can also modify for dietary needs. gluten-free crusts are widely available now, and trust me, a good one will hold up against any traditional crust.
You could even use cauliflower crust for a low-carb option!
Complete Nutrition Guide
Okay, folks, let’s talk about what’s in your pizza. depending on your toppings and portion size, the nutritious value can vary widely.
A standard slice offers around 320 calories , but if you load on those homemade pizza toppings , you might add some good-for-you nutrients, too.
Think fresh veggies packed with vitamins!
And remember, moderation is the key! not every night has to be a family pizza night , but when it is, enjoying it with a side salad can make you feel less guilty.
Plus, those greens help round out the meal!
Expert FAQ Solutions
Got questions? i’ve got answers! one common issue is getting that dough just right. if it’s too sticky, don’t hesitate to add a touch more flour while kneading.
And if it’s not stretching out well, give it a little extra resting time; it’ll surprise you!
Also, if you feel adventurous, mix those custom pizza toppings ! think of sweet and savory combos—ever tried figs and prosciutto? i know it sounds odd, but it’s a hit in my house.
You see? making your own hand-tossed pizza with flavorful sauce is not just a cooking process; it’s an experience! from mastering that dough to getting creative with toppings, each pizza is a little adventure.
So gather your supplies, invite your friends or family, and turn that kitchen into a pizzeria. whether you stick to the classic or explore variations, just know you’re creating something delicious and memorable.
Happy pizza-making, friends!

Ultimate Hand-Tossed Pizza with Flavorful Sauce Card

⚖️ Ingredients:
- 4 cups (480 g) all-purpose flour
- 1 ½ cups (360 ml) warm water (110°F/43°C)
- 2 teaspoons (7 g) active dry yeast
- 1 teaspoon (6 g) sugar
- 2 teaspoons (10 g) salt
- 2 tablespoons (30 ml) olive oil
- 1 can (28 oz / 794 g) crushed tomatoes (preferably San Marzano)
- 2 tablespoons (30 ml) extra virgin olive oil
- 2 cloves garlic, minced
- 1 teaspoon (5 g) dried oregano
- 1 teaspoon (5 g) dried basil
- ½ teaspoon (3 g) red pepper flakes (adjust to taste)
- Salt and pepper to taste
- Fresh basil leaves (for garnish)
🥄 Instructions:
- Step 1: In a mixing bowl, combine warm water, sugar, and yeast; let sit until frothy (about 5-10 minutes).
- Step 2: Add in flour, salt, and olive oil; mix until a shaggy dough forms.
- Step 3: Knead the dough on a floured surface for 8-10 minutes until smooth.
- Step 4: Place the dough in an oiled bowl, cover, and let it rise in a warm spot for 30 minutes.
- Step 5: In a saucepan over medium heat, heat olive oil; sauté minced garlic until fragrant (about 1 minute).
- Step 6: Add crushed tomatoes, oregano, basil, salt, pepper, and red pepper flakes; simmer for 15-20 minutes, allowing flavors to meld.
- Step 7: Place a pizza stone or pan in the oven, preheating to 475°F (245°C) for at least 30 minutes.
- Step 8: Punch down the risen dough and divide it into 2 equal pieces.
- Step 9: On a floured surface, use a rolling pin to roll each piece into a 12-14 inch round, or toss the dough by hand for a more traditional method.
- Step 10: Transfer the dough to a parchment-lined pizza peel or directly onto a floured surface.
- Step 11: Spread a generous layer of tomato sauce on the dough.
- Step 12: Add toppings of choice (e.g., cheese, vegetables, meats).
- Step 13: Carefully transfer the pizza onto the preheated stone/pan.
- Step 14: Bake for 12-15 minutes, or until the crust is golden and the cheese is bubbly.
- Step 15: Remove pizza from the oven; let cool for a couple of minutes before slicing.
- Step 16: Garnish with fresh basil leaves before serving.
Previous Recipe: How to Cook Egusi Soup: My Grandmother's Ultimate Comfort Food
Next Recipe: Ultimate Delicious Shrimp Etouffee in 60 Minutes: A Family Favorite!