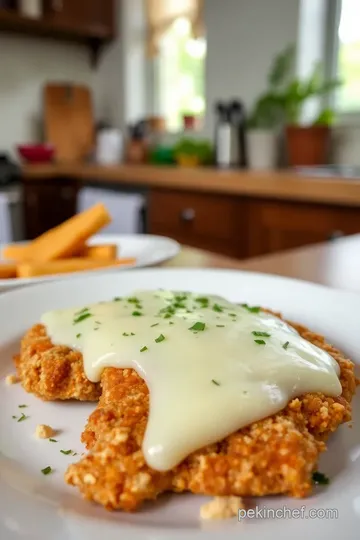
Fried Veal Sorrentino with Delicious Cheesy Layers
Ever wondered how to make my Grandmother's Fried Veal Sorrentino with Delicious Cheesy Layers? It's an easy, flavorful Italian dish sure to impress family and friends!

Let me take you back to one of my favorite family gatherings. picture this: it's a sunny sunday afternoon, the aroma of herbs and frying meats wafting through my grandma's kitchen.
I’m standing there, peeking over the counter, just waiting for her legendary fried veal sorrentino with delicious cheesy layers to make its grand entrance.
Honestly, it felt like an event! have you ever had a dish that just transported you back to your happiest memories? this one does it for me every single time.
Fried veal is not just an italian treat; it’s a whole vibe! think about it: crispy fried cutlets enveloping gooey cheese, inviting flavors of fresh veggies, and, oh boy, that touch of prosciutto—it’s like a hug on a plate! this dish hails from campania, italy, where hearty meals bring families together.
It’s one of those italian veal dishes that screams “comfort food” and is perfect for both everyday dinners and special occasions.
Recipe Overview
Let’s dive into some juicy details! the history behind fried veal sorrentino is rich, with roots that go deep into traditional italian cooking techniques.
Somewhere along the line, folks decided to stuff veal with goodies like cheese and veggies, and boy, did they hit the jackpot! fast forward to today, and this dish is a mainstay at holiday dinners and family gatherings across the u.
S.
Now, before you roll your eyes at the idea of cooking veal, here's the good news: it's not as daunting as it sounds.
This recipe falls into a medium difficulty level, mainly because of the multiple components involved. but don’t sweat it! with a bit of planning, it’s totally doable.
You’ll need about 1 hour and 5 minutes of your time— 15 minutes of hands-on prep, half an hour of letting everything chill out, and about 20 minutes of cooking.
Plus, it serves 4 people , which makes it perfect for a dinner party!
Financially speaking, if you're looking for a gourmet experience without breaking the bank, the costs are quite reasonable. you can whip up a delightful meal without maxing out your credit card.
And trust me, the yield will make it worth your while, leaving everyone raving about your cooking skills.
Key Benefits
Now let’s chat about why this fried veal sorrentino rocks ! first off, it's packed with health benefits. veal is lean, tender, and provides an excellent source of protein.
Combined with sautéed veggies and rich cheeses—think mozzarella and parmesan layers —you’re looking at a well-rounded meal. plus, this dish keeps the family close; who doesn't love gathering around a plate of delicious layered meat dishes ?
I can't stress enough how perfect this recipe is for special occasions . whether it's a cozy family dinner or a holiday celebration, it fits right in.
Think about it: imagine serving this crispy, cheesy goodness at your next dinner party. friends will be impressed, and you’ll smile, knowing it was easier than you expected!
What’s more, this twist on traditional italian recipes offers a unique blend that's hard to beat. it’s way better than a simple fried cutlet variation! plus, with cooking veal tips and a couple of shortcuts, you’ll elevate your home-cooking game in no time.
So, whether you're having a rough day or gearing up for a fancy dinner, this dish will satisfy every craving you’ve got going on.
Let’s gear up to cook this beauty, starting with the ingredients you’ll need. trust me; you won’t want to miss out on this little adventure!
Your Go-To Essential Ingredients Guide for Delicious Italian Cooking
Hey there! if you’re getting ready to tackle some of those mouth-watering italian veal dishes , especially the iconic fried veal sorrentino with delicious cheesy layers , then you've come to the right spot.
Let's dive into everything you’ll need for a successful cookout. ah, the flavors of campania cuisine are calling!
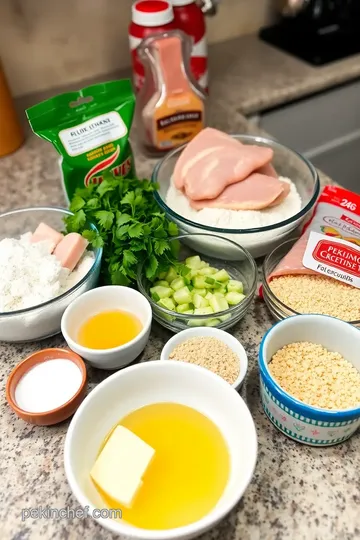
Premium Core Components
Let’s talk about the essential ingredients . We’re not just throwing stuff together; precision is key. You want to ensure the measurements are spot on, right? Here's a quick breakdown:
-
Veal cutlets: grab 4 cutlets about 6 oz each (that’s 170 g, if you’re counting in metric). you’ll pound them down to about 1/4-inch thick—i still remember the first time i pounded veal.
It was oddly therapeutic!
-
Breadcrumbs: a cup of those italian-style goodness (100 g if you prefer the metric system) is what you need. they give your cutlets that crunchy edge—so irresistible! and get this, you can keep them for about 6 months if stored in a sealed container.
When you're at the store, check that your veal looks a bit pink and moist but isn’t slimy. freshness is everything, folks! and don’t forget, once you get home, keep your veal in the fridge—use it within a few days for the best taste.
Signature Seasoning Blend
Now, let’s jazz it up with seasonings . Throw in salt and pepper for sure. But if you want to bring that Sorrentino flair, why not try mixing in some fresh Italian herbs ? Think oreganos and basils—yum! You could even toss in some minced garlic —it’s an essential flavor enhancer, and I can bet you’ll thank me later for that tip!
If you’re feeling adventurous, consider adding something unexpected like red pepper flakes . They can really perk things up without making it too spicy.
Smart Substitutions
Life happens, and sometimes you might find yourself without the perfect ingredient. no worries! if you can’t find veal, go for chicken or even eggplant if you want a vegetarian twist.
Want something gluten-free? just switch the breadcrumbs for a gluten-free version. you'll be amazed how delicious those substitutes can turn out!
And you know what else? if a recipe calls for mushrooms but you’re not a fan, chop in some sautéed zucchini instead.
Trust me, cooking is all about having fun, so don’t stress if things aren’t perfect.
Kitchen Equipment Essentials
Moving on to the tools of the trade! You don’t need to have a fancy kitchen to pull this off. Here’s what you’ll need:
- A large skillet: This is where the magic will happen!
- Tongs or a spatula: To flip those golden cutlets, of course.
- A meat mallet: To pound the veal. It’s an oddly satisfying process—you’ll see!
- Shallow bowls: For your breading station; think of it like a little assembly line.
Do you have all that? Perfect! Now, as you prep, remember: don’t overcrowd your pan. Fry those cutlets in batches to keep them crispy.
Well, it looks like you’re well on your way to making that fried veal sorrentino with delicious cheesy layers ! feeling pumped yet? let’s get cooking! for those step-by-step veal preparation instructions, just keep reading.
You’re going to execute this fabulous dish like a pro and impress your friends or family in no time!
Professional Cooking Method for Fried Veal Sorrentino with Delicious Cheesy Layers
Cooking at home can sometimes feel like an olympic sport, right? but don’t worry! today, we’re diving into the exquisite world of fried veal sorrentino with delicious cheesy layers , an italian veal dish that's not just drool-worthy but also surprisingly manageable with the right approach.
Let’s break it down!
Essential Preparation Steps
First things first, let’s chat about mise en place . this french term just means “everything in its place." before you even think about cooking, set out all your ingredients.
Seriously, it saves so much time and stress later on. grab your veal cutlets , cheeses, prosciutto, mushrooms, and let’s not forget that homemade marinara sauce .
Next up, time management! if you plan your cooking like a game plan for the super bowl, you’ll be golden.
Prep your filling while the veal rests, and while everything's coolin' off in the fridge, you could even throw on some cheesy veal recipes videos for extra inspiration.
And oh! keep your space organized. it’s a game-changer. use separate bowls for your breading station and have your frying pan ready.
Safety is key, too. make sure to handle that hot oil with care — keep the burns at bay!
Step-by-Step Process
Now, let’s roll up our sleeves. Here’s a clear, step-by-step process to tackle this deliciousness:
-
Prepare the Filling:
- Heat 1 tbsp of olive oil in a skillet over medium heat. Sauté 1 tsp minced garlic for about 30 seconds—oh, that smell is unbelievable!
- Toss in 1 cup sliced mushrooms and 1 cup fresh spinach . Cook until just tender, about 2- 3 minutes. Season with salt and pepper .
- Remove from heat and mix in 1 cup shredded mozzarella and ½ cup grated Parmesan .
-
Prepare the Veal:
- Pound those veal cutlets to about 1/4 inch thick . Season with salt and pepper ; we want flavor in every bite!
-
Bread the Cutlets:
- Set up your breading station : flour ( 1 cup ), whisked eggs ( 2 large ), and Italian breadcrumbs ( 1 cup ).
- Dredge each cutlet in flour, dip in egg, then coat in breadcrumbs.
-
Assembly:
- Lay down 2 slices of prosciutto on each cutlet, then pile on that cheesy filling. Roll ‘em up tight and secure with toothpicks or kitchen twine.
-
Frying:
- Heat oil in a skillet to 350° F ( 175° C) . With care, place the cutlets into the hot oil, frying for about 4- 5 minutes per side , or until golden brown. You’re gonna see that crispy exterior that’s just irresistible!
- Drain on paper towels afterward.
-
Serve:
- Remove toothpicks, slice each roll in half, and drizzle some marinara sauce on top.
Expert Techniques
For those looking to elevate their game, here are some expert tips. check your internal temperature with a food thermometer — aim for 165° f ( 74° c) to make sure your veal is safe and cooked just right.
Also, if you want that next-level crunch, try double-breading: dip in egg and crumbs twice before frying. if it starts to get messy, just breathe! cooking is a journey, and we’ve all made a splatter at some point.
Success Strategies
Every chef, no matter how seasoned, has made a few mistakes in the kitchen. common pitfalls? overcrowding the frying pan! it leads to uneven cooking and soggy cutlets.
Try frying in batches instead.
Make-ahead options? chill the rolled cutlets for 15 minutes before frying. this helps them hold their shape beautifully. and remember, it’s all about quality assurance—snag a taste before serving, and tweak your seasonings as needed.
So, gather your friends or family around because this fried veal sorrentino with delicious cheesy layers isn’t just food; it’s an experience! if you’re hungry for more, let’s dive into the next section: additional information .
look into Deeper into Fried Veal Sorrentino with Delicious Cheesy Layers
Ah, the joy of cooking! today, we’re taking a closer look at one of my all-time favorites: fried veal sorrentino with delicious cheesy layers.
This dish is bursting with flavor and can take your italian dinner game from zero to hero. let’s break it down a bit, shall we?
Pro Tips & Secrets
Here’s a little secret: the key to that perfectly tender veal cutlet? it’s all in the pounding. when you go all-out with a meat mallet, it breaks down those fibers and makes it so much easier to cook! also, chilling those rolled cutlets in the fridge for about 15 minutes before frying helps them keep their shape.
You don’t wanna lose all that cheesy goodness when you dive into that hot oil, am i right?
Flavor enhancements are easy, too. consider adding fresh herbs like basil or parsley to your cheese mix. it uplifts the dish subtly, giving you that fresh ‘italian grandma in the kitchen’ vibe.
And speaking of vibes, don’t forget to have fun while cooking! it’s about good times and delicious memories.
Perfect Presentation
You eat with your eyes first, so let’s make it pretty! when serving, use plating techniques that showcase those cheesy layers.
Slice the cutlets in half, and lay them on their side to reveal the gooey mozzarella and parmesan. for a garnish , sprinkle some chopped parsley or a few slices of cherry tomatoes to add that fresh pop of color.
Trust me, those colors just scream “italian comfort food!”
Mixing colors on your plate helps too. Think roasted veggies or a vibrant salad on the side. The visuals not only enhance the meal, they make for fabulous dinner party conversations.
Storage & Make-Ahead
Planning to make this dish ahead of time? smart move! just follow these storage guidelines . you can keep your cooked cutlets in the fridge for about 3 to 4 days .
If you need to stow ‘em longer, pop them in the freezer — they should last up to 3 months .
Just be sure to wrap them tightly in foil or freezer bags to keep that moisture locked in.
Reheating? pop them in the oven at 350° f ( 175° c) for about 15- 20 minutes . this way, they will retain their crispiness instead of getting all soggy in the microwave.
Ain't nobody got time for soggy cutlets!
Creative Variations
Now, let’s talk about some fun twists! this recipe is a canvas — you can mix it up with seasonal veggies or switch up the cheese.
Ever tried adding sun-dried tomatoes for a sweet punch? or maybe even spicy olives for a little kick? don’t be shy; get creative!
If you’re dealing with dietary restrictions, you could swap out the veal for chicken in this fried cutlet variation . it’s super versatile and still brings that italian flair! you can also make a gluten-free version using breadcrumbs made from gluten-free bread without missing out on that crispy goodness.
Complete Nutrition Guide
You might be wondering about the nutrition, right? let’s dive into a quick breakdown . each serving packs approximately 450 calories , with a nice balance of 30 grams of protein .
It’s hearty but still gives a touch of comfort that won’t weigh you down after a meal.
When enjoying this dish, keep portion guidance in mind; it’s easy to overindulge in such a delightful dish. for special occasions like holidays or dinner parties, it’s a fantastic option that tastes gourmet without the fuss.
Expert FAQ Solutions
Got questions? you’re in good company! one of the most common concerns is about the frying process. troubleshooting ? if your cutlets aren’t crisping up, be sure to check that your oil is hot enough — around 350° f .
If the temperature is off, you risk greasy cutlets instead of those crispy fried wonders !
Feeling brave? Experiment with different fillings! Whether sticking with the classic or adding a layer of sautéed veggie goodness, the options are endless.
Wrapping It Up
So there you have it! with fried veal sorrentino with delicious cheesy layers , you’ve got a dish that marries tradition and creativity, perfect for any occasion.
It’s a stellar option for family-friendly italian meals or a fancy dinner party. so roll up your sleeves and enjoy the cooking process.
Trust me; it’s worth every delicious bite! you’ll be serving up smiles around the dinner table in no time!

Fried Veal Sorrentino with Delicious Cheesy Layers Card

⚖️ Ingredients:
- 4 veal cutlets (about 6 oz each or 170 g), pounded thin
- 1 cup (120 g) all-purpose flour
- 2 large eggs
- 1 cup (100 g) breadcrumbs (preferably Italian-style)
- Salt and pepper, to taste
- Oil, for frying (canola or vegetable)
- 4 slices of prosciutto (about 2 oz or 56 g)
- 1 cup (150 g) sliced mushrooms
- 1 cup (150 g) fresh spinach
- 1 cup (100 g) shredded mozzarella cheese
- ½ cup (50 g) grated Parmesan cheese
- 1 tsp minced garlic
- 1 tbsp olive oil
- ¼ cup (60 ml) marinara sauce (for serving)
🥄 Instructions:
- Step 1: Heat olive oil in a skillet over medium heat. Sauté minced garlic for 30 seconds until fragrant. Add sliced mushrooms and spinach; cook until softened. Season with salt and pepper. Remove from heat and mix in mozzarella and Parmesan cheeses.
- Step 2: Pound veal cutlets to about 1/4 inch thickness if not pre-pounded. Season both sides with salt and pepper.
- Step 3: Set up a breading station: place flour in one bowl, whisked eggs in another, and breadcrumbs in a third. Dredge each cutlet in flour, shaking off excess. Dip in the egg mixture, then coat with breadcrumbs. Press to adhere.
- Step 4: Lay prosciutto on each cutlet, followed by a generous amount of the cheese filling. Roll each cutlet tightly and secure with toothpicks or kitchen twine.
- Step 5: Heat oil in a skillet to 350°F (175°C). Carefully place rolled cutlets into the hot oil and fry until golden brown and cooked through, about 4-5 minutes per side. Transfer to a paper towel-lined plate to drain excess oil.
- Step 6: Remove toothpicks or twine and slice each cutlet in half. Serve warm with a drizzle of marinara sauce on top.
Previous Recipe: My Grandma's Sautéed Tofu with Spicy Dill & Olives: A Vegan Gem
Next Recipe: How to Make a Quick Burrito with Flavorful Beef Filling: 5 Easy Steps!