Crispy Salmon Skin Roll with Fresh Vegetables
Wondering how to create a crispy salmon skin roll? This delightful sushi recipe combines fresh veggies and roasted salmon skin for an amazing flavor that’ll impress.

- A Sushi Adventure: Crispy Salmon Skin Roll
- Essential Ingredients Guide for Sushi Lovers
- Mastering the Art of Sushi: Professional Cooking Tips
- Pro Tips & Secrets for a Perfect Salmon Skin Roll
- Perfect Presentation: Make Your Rolls Shine
- Storage & Make-Ahead: Be Smart with Leftovers
- Creative Variations: Switch It Up!
- Complete Nutrition Guide: What’s in Your Roll?
- Expert FAQ Solutions: Your Sushi Troubleshooting Guide
- Recipe Card
A Sushi Adventure: Crispy Salmon Skin Roll
When i first tried a salmon skin roll , oh my gosh, it was like a flavor explosion! picture this: i’m sitting in a buzzing little sushi joint, the air filled with the savory scents of soy sauce and fresh fish.
I took one bite, and i was hooked! that amazing crispy texture paired with the freshness of veggies? instant love affair.
If you’ve ever craved that crunchy, creamy vibe in your sushi, diving into this sushi recipe might just be your next happy place.
Rollback in Time: Sushi's Rich History
Sushi has a rich history; it dates back centuries in japan. it started as a way to preserve fish, wrapping it in fermented rice.
Now, it’s evolved into these beautiful nori rolls stuffed with everything from fish to fresh veggies. the salmon skin roll made its way into modern sushi bars as a classic favorite, blending old traditions with new, exciting flavors.
Today, it’s popular not just in sushi restaurants but also as a fun night in with friends, a perfect way to break the ice at a party or enjoy a cozy dinner at home.
What to Expect: Time and Cost
Now, let me break it down for you. this salmon roll recipe isn’t too complicated, but don’t get it twisted; it’s not for total beginners either.
Think of it as a fun challenge! you’ll need about 1 hour and 20 minutes in total, including prep and cook time.
When it comes to cash, expect to spend around $15-$20 for ingredients, depending on where you shop. and trust me, the yield is totally worth it—around 8-10 pieces from each roll!
The Bright Side: Health Benefits
Here’s what’s really cool: the crispy sushi rolls are not just tasty but also pretty healthy! salmon skin is packed with omega-3 fatty acids, which are great for your heart.
The veggies? they’re loaded with vitamins. plus, you get to control the sushi ingredients and make them as fresh as you want.
Perfect for special occasions, sushi night at home, or just when you want to impress your friends with your culinary skills!
Why It Rocks: Unique Selling Points
There’s just something so satisfying about the crunchy salmon skin against the creamy avocado and crisp veggies. it’s a surprising twist to traditional sushi.
You can customize this recipe to fit whatever your heart desires. want to throw in some spicy mayo? go for it! looking for healthy sushi options ? swap the salmon skin for plant-based fillings like tempura veggies for a fresh take.
Not only can you play with ingredients, but you can also spark conversations as you assemble those rolls!
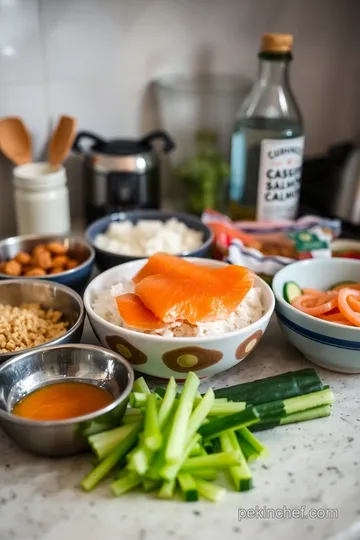
As you get ready to dive into the deliciousness of this salmon skin roll , let’s grab the ingredients you’ll need.
You’re going to want to make this crunchy goodness from the comfort of your kitchen! so, roll up your sleeves and let’s whip up some delightful sushi together!
Essential Ingredients Guide for Sushi Lovers
Oh my gosh, let's talk sushi ! it’s not just a meal; it's an event, an experience. whether you're throwing a sushi night at home with friends or just craving a salmon skin roll , knowing your ingredients and tools is key to success in the kitchen.
Buckle up because we’re diving into an essential ingredients guide to set you up for some fabulous homemade sushi .
Premium Core Components: Know Your Ingredients
Before we get rolling (pun intended!), here are some must-have ingredients for your sushi creations. whether you're making crispy sushi rolls or trying your hand at a classic salmon roll recipe , these basics will keep you on track.
Sushi rice : the backbone of any sushi roll. you'll need 1 cup (200 g) of short-grain sushi rice and 1 ¼ cups (300 ml) water.
The key here? rinsing the rice until the water runs clear. it helps to remove excess starch, keeping your rice fluffy and perfect.
Quality Indicators : Fresh sushi rice should have an opaque white color. Store it in a cool, dry place , and it’ll last for up to a year!
Freshness Tips : Always buy sushi rice from a reputable store, and make sure it’s sealed. It’s best to avoid expired ingredients—nobody wants a sad, stale sushi night.
Signature Seasoning Blend: Spice Up Your Sushi
Alright, let's jazz it up a bit! the signature seasoning blend is what elevates your sushi flavors and textures . you’ll want to mix 2 tablespoons (30 ml) of rice vinegar, 1 tablespoon (12 g) of sugar, and ½ teaspoon (2 g) of salt to season that rice like a pro.
Essential Spice Combinations : Sriracha and mayo make a magical duo for a spicy kick in your rolls. Feel adventurous? Try adding sesame oil!
Herb Pairings : Fresh herbs are always a hit. Try adding cilantro or basil for a twist on traditional sushi.
Smart Substitutions: Rolling With It
When it comes to sushi, the beauty lies in its flexibility. You can easily make dietary modifications or swap in emergency replacements based on what you’ve got at home.
Common Alternatives : Don’t have nori ? Grab some rice paper. It’ll offer a cool, different texture for your rolls.
Seasonal Options : Use whatever veggies are in season. Think radishes in spring or roasted sweet potatoes in the fall as delightful sushi fillings .
Kitchen Equipment Essentials: Tools of the Trade
Now that we've tackled the ingredients, let’s chat about tools. Here’s what you’ll need for successful sushi assembly :
Must-Have Tools : A sharp knife is crucial for clean cuts. A bamboo sushi mat comes in handy for rolling, making it easier to create tight rolls.
Alternative Equipment : If you don’t have a mat, no sweat. Use a clean kitchen towel or plastic wrap to help with the rolling.
Preparation Tips : Lay everything out beforehand. It makes the sushi preparation time a breeze and reduces mess.
Wrapping It Up!
Alright, friends! we’ve covered a lot, and now you're armed with the knowledge to create some jaw-dropping sushi, including my all-time favorite crispy salmon skin roll .
You’ll be amazed at how easy it is to put this together with the right ingredients and tools.
Next up, we’ll dive into actual sushi making instructions. get your rice cooked, gather those ingredients like fresh veggies and savory toppings, and prepare for some serious rolling! let’s get into the fun part— crafting your own sushi rolls for that perfect home sushi dinner.
Trust me, after trying this out, you’ll be the go-to sushi chef among your friends!
Mastering the Art of Sushi: Professional Cooking Tips
You ever catch yourself daydreaming about sushi rolls? if you’re anything like me, you’ve found yourself in a deep conversation about the perfect sushi dinner ideas or reminiscing about a fantastic sushi night at home.
So, let’s dive into how to whip up a fantastic crispy salmon skin roll and nail that sushi-making experience.
Essential Preparation Steps
First things first - we gotta get our ducks in a row, or should i say, sushi ingredients in check.
This is where mise en place comes into play. so grab your short-grain sushi rice, nori rolls , and those fresh veggies.
Put everything out, and let’s have some fun! rinse the rice until the water runs clear; trust me, it makes a difference.
You want fluffy sushi rice, not mushy stuff, right?
Time management is crucial here. prep and chill. use those 20 minutes of active prep wisely while your rice cooks away.
And don’t forget about safety! keep your workspace clean and avoid cross-contamination, especially if you’re working with fish. always wash those hands!
Step-by-Step Process
Here’s where the magic happens!
-
Cook the Sushi Rice:
- Put 1 cup of sushi rice and 1 ¼ cups of water in your rice cooker. Let it do its thing. It usually takes about 15 minutes .
-
Season:
- In a small bowl, combine 2 tablespoons of rice vinegar, 1 tablespoon of sugar, and ½ teaspoon of salt . Once your rice is cooked and still warm, fold in that mixture gently like you're tucking in a little sushi baby.
-
Roast Salmon Skin:
- Preheat your skillet. Lay that fish skin on there, and let it roast for about 10- 15 minutes until it’s crispy. The scent? Yeah, it’ll have you dreaming already.
-
Chop your Veggies:
- Julienne that cucumber and carrot. I personally love slicing and munching as I go. A quick avocado slice can’t hurt either.
-
Assemble:
- Lay down a sheet of nori, about ⅓ cup of sushi rice across the bottom, leaving an inch on the edge. Put your salmon skin, cucumber, carrot, and avocado right in the middle.
-
Roll it up:
- Time to embrace your inner sushi rolling expert. Roll it tightly away from you, using the bamboo mat for a little help.
-
Slice and Serve:
- Wash your sharp knife, and chop those rolls into 8-10 pieces. Pretty!
Expert Techniques
Okay, let's get into the nitty-gritty! Adopting some professional methods can take your sushi game to another level.
-
Crispiness is Key: When roasting the salmon skin, 220° F is where you want to keep it. Perfect browning ensures crispy goodness!
-
Quality Checkpoints: After you roll, check that your sushi isn’t oozing or leaking. If it is, you've got some rolling practice to do, but don't sweat it; every pro has been there!
-
Troubleshooting: if your sushi rice is too gummy, you may have skipped the rinsing step. go back to basics and start fresh.
A solid sushi rice preparation will keep it light and fluffy.
Success Strategies
Now, let’s avoid some common pitfalls, shall we?
-
Avoid adding too much filling. It can get messy, and trust me, you don’t want your crispy sushi rolls exploding in your hands.
-
Quality assurance is vital. Only buy fresh fish and veggies! That’ll elevate your sushi flavors and textures instantly.
-
Wanna save yourself some time? Make sushi rice ahead. Chill it before you need it, and avoid scrambling last minute for the perfect sushi party.
Closing Thoughts
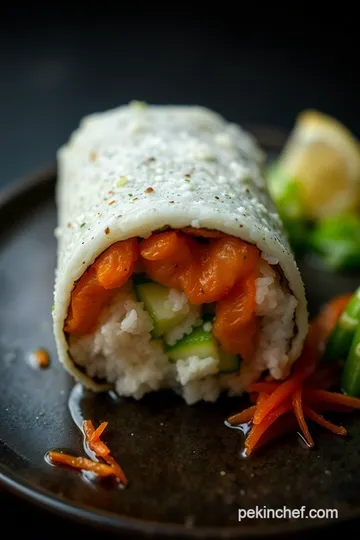
So there you have it! the crispy salmon skin roll is not just a dish; it’s an experience that brings people together.
Whether you’re crafting an avocado sushi roll or a unique sushi roll loaded with seafood, it’s always about the joy of making sushi at home and sharing it with those you love.
A little practice leads to perfection, and before you know it, you’ll be the sushi master among your friends! get ready to impress that crowd at your next sushi night or family dinner.
Trust me, you’ll be craving those salmon sushi rolls long after the last piece has been devoured.
Stay tuned for more yummy cooking tips and somethin’ special in our next section, Additional Information…
Pro Tips & Secrets for a Perfect Salmon Skin Roll
Okay, folks, let’s get down to the nitty-gritty. making a crispy salmon skin roll is seriously one of the coolest kitchen projects you can tackle.
I mean, who doesn’t want to impress their friends with awesome sushi? here’s some inside scoop straight from my kitchen to yours.
First off, let's chat about time-saving techniques . if you’re rushing, make your sushi rice preparation ahead of time. you can cook it a day before and store it in the fridge.
Just warm it up before you start rolling. trust me; no one wants to be waiting around while the rice cooks.
Next, let’s talk flavor enhancement. a little splash of rice vinegar in your sushi rice adds that zesty punch. for that extra layer of yum, try marinating your roasted salmon skin for about ten minutes in a mix of soy sauce and sesame oil before adding it to your roll.
This gives it an awesome depth of flavor.
When it comes to presentation advice , make your rolls look as good as they taste! roll them tightly and cut them with a sharp knife.
I swear by this trick: run your knife under cold water between cuts. it’ll prevent the rice from sticking to the blade and give you those clean, beautiful slices.
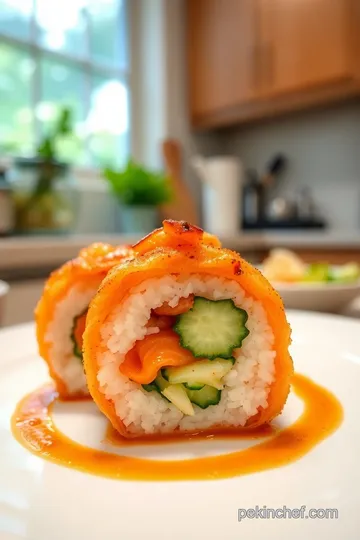
Perfect Presentation: Make Your Rolls Shine
Now, let’s make your sushi presentation top-notch! plating is everything, friends. arrange your sushi slices on a long plate for that fancy restaurant vibe.
I toss in a sprinkle of sesame seeds for that extra pop.
Oh, and don’t skimp on garnish ideas ! a few slices of pickled ginger and a small dollop of wasabi make it visually appealing.
If you’re feeling artsy, garnish with a little drizzle of soy sauce. just think of it as sushi art!
Color combos are key, too! the vibrant green of cucumbers and the bright orange of carrots standing next to that golden salmon skin makes every bite a joy.
It’s all about that visual appeal .
Storage & Make-Ahead: Be Smart with Leftovers
Let’s be real—sometimes you might end up with extra sushi. here’s how to store it: wrap your leftover rolls tightly in plastic wrap and chill them in the fridge.
They’ll last about a day, but freshness is the name of the game here. if you’re storing your sushi rolls , eat them within 24 hours for the best experience.
You can also prep the sushi ingredients in advance. just keep the nori rolls separate until you’re ready to eat.
If they get too moist, they won’t roll properly, and no one wants a soggy roll!
Creative Variations: Switch It Up!
Let’s talk about variations . If you wanna jazz things up, consider making a spicy salmon skin roll by adding some sriracha mayo. Who doesn’t love a little heat?
And for my vegetarian friends out there, you can swap the salmon skin with tempura vegetables for a fantastic crunch. You’ll still get that satisfying texture without the seafood.
For a health kick, try incorporating quinoa instead of traditional sushi rice. It’s a great way to sneak in some extra nutrients, and trust me, it still tastes bomb.
Complete Nutrition Guide: What’s in Your Roll?
So, you’re probably asking yourself, “what am i really eating?” well, each roll has about 250 calories , and you’re getting a decent amount of protein and healthy fats from the salmon and avocado.
Plus, lots of vitamins from those fresh vegetable sushi fillings, making it a great healthy sushi option .
If you're keeping a close eye on what you eat, just remember: portions matter. try to keep each roll around the same size—aim for about 8-10 pieces per roll to keep things balanced.
Expert FAQ Solutions: Your Sushi Troubleshooting Guide
I get it; making sushi can feel intimidating, especially for beginners! common questions include “what if my sushi rice is too sticky?” or “why didn’t my rolls hold together?” well, my first few attempts ended up looking more like sushi salad, so don’t sweat it! remember to rinse that rice thoroughly to remove excess starch for perfect sushi rice.
And if you’re struggling with rolling, don’t hesitate to go back and watch some sushi assembly techniques online. Practice makes perfect!
So whip out that sushi mat, grab your sushi ingredients , and get rolling. You’ll have a blast making sushi at home while making some delicious memories along the way.
In the end, remember that making sushi at home is not just about the food—it's about the experience. gather your friends, fire up those sushi rolling tips , and make a night out of it! enjoy the flavors, the textures, and all the fun that comes with making your own crispy salmon skin roll.
Can't wait to see your creations!
Crispy Salmon Skin Roll with Fresh Vegetables Card

⚖️ Ingredients:
- 1 cup short-grain sushi rice (200 g)
- 1 ¼ cups water (300 ml)
- 2 tablespoons rice vinegar (30 ml)
- 1 tablespoon sugar (12 g)
- ½ teaspoon salt (2 g)
- 1 cup roasted salmon skin (200 g)
- ½ cucumber, julienned (1 medium cucumber)
- 1 medium carrot, julienned (about 70 g)
- ½ avocado, sliced
- 4 sheets nori (seaweed)
- Soy sauce, for serving
- Wasabi and pickled ginger (optional, for serving)
🥄 Instructions:
- Step 1: Rinse rice under cold water until water runs clear.
- Step 2: Cook rice with water in a rice cooker or pot until tender.
- Step 3: In a small bowl, mix rice vinegar, sugar, and salt until dissolved.
- Step 4: Fold mixture into cooked rice gently, then let cool.
- Step 5: Roast salmon skin in a skillet or on a baking sheet until crispy (about 10-15 minutes). Set aside to cool.
- Step 6: Julienne cucumber and carrot. Slice avocado.
- Step 7: Place a sheet of nori, shiny side down, on a bamboo mat.
- Step 8: Spread a thin layer of sushi rice (about ⅓ cup) evenly over nori, leaving a 1-inch border.
- Step 9: Lay ingredients (salmon skin, cucumber, carrot, avocado) in a line across the center.
- Step 10: Using the bamboo mat, roll tightly away from you, pressing gently, until sealed.
- Step 11: Repeat for remaining nori sheets.
- Step 12: Use a sharp knife to slice rolls into 8-10 pieces, wiping the knife with a damp cloth between cuts.
- Step 13: Arrange sushi on a plate with soy sauce, wasabi, and pickled ginger on the side.
Previous Recipe: Ultimate Decadent Chips and Queso: 5 Amazing Pairings to Try!
Next Recipe: How to Make Crispy Boom Boom Shrimp: 5 Delicious Secrets!