Coal Miner’s Sauerkraut in a Jar
Discover the coal miner's recipe for sauerkraut in a jar! Unleash the art of homemade fermented cabbage with easy tips and techniques for delicious results.

Have you ever thought about how a simple head of cabbage can transform into a tangy, probiotic-packed delight that makes your gut sing? if you’re like me and have spent years taking soggy store-bought sauerkraut for granted, it might be time to rethink things.
Making coal miner's sauerkraut in a jar is not only a nod to tradition but is also a simple way to elevate your meals and impress friends with your newfound fermentation skills.
The best part? it only takes about 30 minutes of hands-on work , but you’ll need to wait a bit—anywhere from 1 to 4 weeks for fermentation —before you can fully enjoy the fruits of your labor.
No special chef skills are required; if you can shred cabbage and sprinkle salt, you’re halfway there!
A little history for you: sauerkraut has its origins dating back thousands of years, with the oldest mentions found in ancient china.
It quickly became a staple throughout europe, particularly among german and eastern european communities, who appreciated its ability to preserve cabbage through the winter months.
This delicious fermented food made its way to america, thanks to german immigrants, connecting us to our heritage with every crunchy bite.
What makes this recipe special? it’s not just about preserving cabbage in jars; it's about creating a living food brimming with probiotics and flavor that promotes gut health while reminding us of our roots.
So, let’s dive into the culinary journey of coal miner’s sauerkraut . this dish has a rich tradition tied to eastern european coal miners who sought nourishment through hearty, cost-effective meals.
They crafted their sauerkraut using whatever they had on hand to ensure they could enjoy it throughout the harsh winter months.
This humble food not only provided sustenance but also infertility for health; it's said that sauerkraut helps keep the gut balanced with its robust array of probiotics.
Nowadays, it’s taken on a new life with millions of fans across the globe who recognize its versatility—bringing it beyond just a side dish, to an essential twist in salads, tacos, or even burgers!
Now, listen closely, my friends—if you’re turning your nose up at the thought of making homemade sauerkraut because you think it's too complicated or time-consuming, i’m here to tell you otherwise.
This version boasts unique flavor combinations like the earthiness of caraway seeds and the punch of garlic, both of which can elevate the humble cabbage to something truly fantastic.
Plus, the technique is just foolproof enough for even the most hesitant kitchen novice. trust me, once you get the hang of it, you’ll feel like a fermentation wizard and find yourself looking for excuses to whip up another batch.
Might as well enter the realm of sauerkraut dominance!
Nutritionally speaking, sauerkraut is packed with goodies. one cup comes in at just 27 calories , along with fiber, vitamin c, and all those fabulous probiotics that your gut will absolutely love.
With health benefits ranging from digestion support to immune system boosts, the fermented foods benefits are a win-win for anyone wanting to sneak some extra health into their diet.
You can even explore variations to cater to your dietary needs—whether you’re gluten-free, looking for low-calorie snacks, or simply searching for creative ways to include fermented foods in your meals, sauerkraut does it all.
Alright, let’s break down the essentials for making this sauerkraut at a glance:
- Total preparation time : 30 minutes
- Fermentation time : 1-4 weeks (depending on how bold your sourness preference is)
- Difficulty level : Easy-peasy
- Serving size : About 1 cup per jar
- Cost efficiency : Super budget-friendly, especially compared to store-bought varieties!
Feeling ready to take the plunge? as we embark on this flavorful adventure, let’s gather our ingredients, set the stage for a little fermentation magic, and in no time, you’ll have delicious jars of homemade kraut that you can be proud of.
So, grab your cabbage , salt, and a bit of ensoiasm—i promise you’re gonna love it!
Premium Ingredients Guide
Premium Core Ingredients
When diving into the coal miner's recipe for sauerkraut in a jar , you really want to think about the quality of your ingredients.
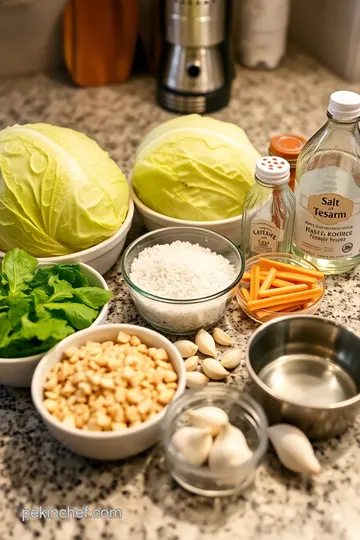
Let’s break it down, shall we? for this recipe, you'll need two medium heads of cabbage , which usually comes to about 4-5 pounds total .
Look for vibrant green heads with firm, tight leaves — that tells you they’re fresh and crisp.
Next up is kosher salt . you'll need about three tablespoons . i can’t stress enough: make sure it’s non-iodized. otherwise, it can screw up your whole fermentation process.
As for caraway seeds , a tablespoon adds a lovely depth of flavor, but if you’re not into the whole licorice vibe, skip ‘em.
Oh, and don’t forget garlic — four crushed cloves if you're in the mood for some extra zing.
For storing and rinsing, keep some filtered water handy — this’ll help keep things clean and crisp.
Signature Seasoning Blend
Let’s talk about creating that signature seasoning blend that makes your sauerkraut pop. i love mixing in caraway seeds because they add that earthy flavor that just screams nostalgia.
Maybe it reminds me of grandma's kitchen or one of those old-fashioned pubs in town — you know, the ones where the wood beams are almost as old as the coal miners themselves?
Sometimes, i toss in a pinch of crushed red pepper if i’m feeling adventurous. just a little heat to evoke that comforting warmth.
And while garlic is optional, it’s like the cherry on top of your sauerkraut cake. not to mention, it boosts the probiotics we all adore from fermented foods!
Smart Substitutions
If you don’t have cabbage on hand, don’t despair! you could try shredded brussels sprouts or even napa cabbage as alternatives.
It’s about keeping things flexible in the kitchen. similarly, if you're watching your sodium intake or just prefer a salt-free diet, lemon juice could act as an emergency replacement, providing that tangy taste without all the salt.
Feeling seasonal? Spring vegetables like radishes can add a fresh twist. Taste is subjective; feel free to experiment!
Kitchen Equipment Essentials
Let’s not forget the tools of the trade! you’ll absolutely need a large mixing bowl — it’s where all the magic begins.
A sharp knife or mandoline helps you slice that cabbage paper-thin, and trust me, you want it as thin as possible for proper fermentation.
Having a bunch of clean glass jars handy is crucial. i like using mason jars, but anything glass that seals will do.
And then there’s the mixing spoon ; a simple wooden spoon will work wonders, but, hey, if you want to get fancy with a silicone spatula, i’m not stopping you!
If you’ve got them, weights can keep that sauerkraut submerged. nothing fancy, just some clean stones or even heavy kitchen gadgets you have lying around will do great.
And you might find that a kitchen scale comes in handy, especially if you’re trying to get consistent weights for your cabbage.
Pro Ingredient Tips
Here's a little wisdom from my own kitchen misadventures: when selecting your cabbage, look for any cracks or soft spots; those can signal decay.
And when it comes to salt, keep an eye out for coarse kosher varieties — they generally work best for fermentation.
As for storage, before you pop your jars in the fridge, give them a shake to settle the contents and then seal.
One more thing: don’t forget to share a bit of your sauerkraut with friends! After all, why keep all the goodness to yourself?
So, now that you’re all set with ingredients and kitchen gear, would you believe me if i said it’s time to roll up our sleeves and get our hands a bit messy? let's wade into the delightful world of making your very own sauerkraut! you’re gonna love the process.
Coal Miner’s Sauerkraut in a Jar: Master Chef's Method
There’s just something so homey about sauerkraut, don’t you think? it harkens back to simpler times—like when my granddad would boast about his coal miner’s recipe for sauerkraut in a jar.
His thick, flavorful sauerkraut was a staple at family gatherings and much adored by everyone, especially when paired with hearty winter meals.
If you're keen on diving into this tradition, roll up your sleeves and let’s get started on the easiest diy sauerkraut you can whip up!
Essential Preparation Steps
Before we jump into the fermentation process, let’s chat about some essential prep work that will set you up for success.
-
Mise en place details : gather all your ingredients first—two medium heads of cabbage, kosher salt, garlic, caraway seeds, and enough clean glass jars.
Aim for 1-2 jars per batch, as sauerkraut keeps well.
-
Prep techniques : use a sharp knife or mandoline to shred the cabbage. think about it this way: the thinner the shreds, the quicker the fermentation.
The last thing you want is a chunky kraut that takes forever to ferment.
-
Time Management : While the prep takes about 30 minutes, the fermentation process stretches from 1 to 4 weeks, depending on how tangy you like it. So, be patient!
-
Organization tips : keep your workspace tidy. fermentation can get a tad messy, and trust me, the last thing you want is a cabbage mishap on the floor.
I learned that the hard way!
Professional Cooking Method
Alright, here comes the fun part—the step-by-step process to get your sauerkraut bubbling away.
-
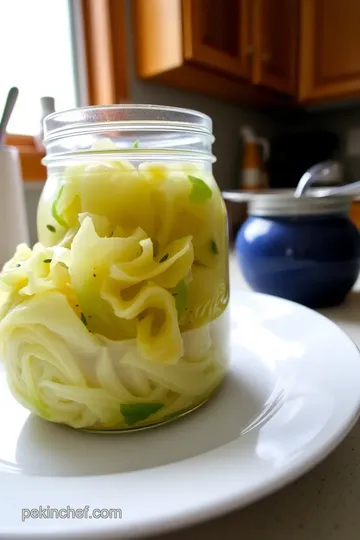
Prepare the Cabbage : Remove those tough outer leaves (don’t throw them away—they’re great for compost!), and then quarter the heads. Cut out the core and slice the cabbage into thin strips.
-
Mix cabbage and salt : toss your shredded cabbage into a large bowl with 3 tablespoons of kosher salt. now comes the workout—massaging the salt in for about 5-10 minutes.
You’re looking for that magical moment when the cabbage begins to release its juices to form a brine.
-
Add Flavorings : If you’re feeling adventurous, toss in the crushed garlic and caraway seeds. It’s like giving the kraut a warm hug of flavor. Mix it all together evenly.
-
Pack into jars : time to pack the cabbage mixture into your jars. be sure to pack it tightly—yes, really smash that cabbage down! leave about 1-2 inches of headspace; trust me, it’ll bubble up.
-
Seal the Jars : Use a lid but don't crank it down too hard—allow those gases to escape. A clean cloth over the top works, too.
-
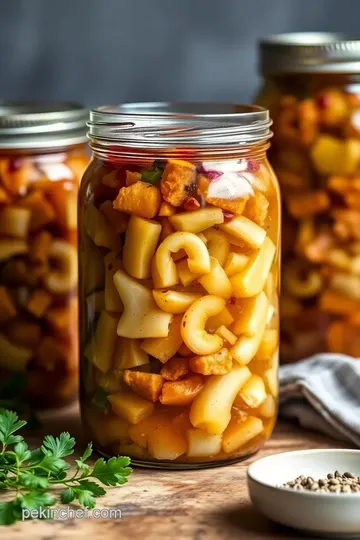
Fermentation : find a cozy dark spot for your jars, ideally around 60-70°f (15-21°c). it’s like giving your kraut its own spa day.
Check it every few days, and gently press it down to keep it submerged in its brine.
-
Taste testing : after a week, pop open a jar and see how it’s doing. still sweet? let it go longer, up to 4 weeks.
It’s like unwrapping a surprise gift—sometimes it takes a few rounds to find your perfect sour spot.
-
Storage : Once it’s reached delicious tanginess, seal your jars tightly and stash them in the fridge. This will slow down the fermentation, and now you’ve got your very own homemade fermented cabbage!
Expert Techniques
Here are some precise techniques that can help elevate your sauerkraut game.
-
Temperature Control : Keep it cool, but not too cold. Too warm, and you’ll risk spoilage.
-
Timing Precision : A week might be enough for you, or you might go the full four weeks. The key is to check, taste, and adjust as needed.
-
Success Indicators : Look for a nice sour smell and the right tanginess. If it smells off, there’s a chance something went awry.
Success Strategies
Nobody’s perfect, and neither is cooking! Here are some tips to safeguard against mishaps:
-
Troubleshooting Tips : If your cabbage isn’t softening or there’s no brine, try squeezing it more as you pack it into jars.
-
Quality Assurance : Always check for funky smells or floating mold. If you spot mold, remove it, and if the smell is off, discard the batch—it’s just not worth the risk.
-
Perfect Results Guide : Don’t rush it! Good things take time, and homemade sauerkraut is no different.
Now that you’re all set to dive into the world of diy sauerkraut, get ready for endless variations! whether you want to add beets or go spicy, the fermentation world is your oyster—or should i say, your cabbage? up next, i’ll share some creative ways to use your sauerkraut in everyday meals and some delicious side dish pairings.
Trust me—it’s gonna be worth it!
Game-Changing Tips
Professional Insights
When it comes to making homemade fermented cabbage , the secret sauce isn’t just the cabbage—it's all about patience and environment .
Having a clean kitchen is step one, but do you know that the air around your fermenting jars needs to be just right too?
Expert Techniques
Here’s a nugget from my own kitchen trials: i used to be super excited to dig into my fermentation straight away, but learned the hard way that time is in fact a friend in this process.
Letting your kraut ferment for at least a week can really deepen those flavor profiles!
Kitchen Wisdom
I stumbled upon some kitchen wisdom from a seasoned fermentation ensoiast that stressed the importance of using non-iodized salt . kosher salt is perfect.
It doesn’t just flavor; it plays a vital role in the fermentation process itself.
Success Guarantees
Want to guarantee success? Use a non-reactive container. Glass jars are your best pals here. They not only look good but are also super functional for something like sauerkraut fermentation .
Perfect Presentation
Plating Techniques
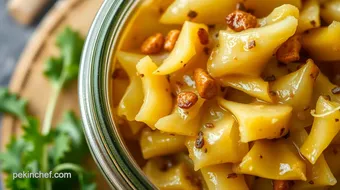
When it comes to serving, don’t just plop the sauerkraut on the plate. Mound it like a little peak, and let those curls and edges tell you a story.
Garnish Ideas
Want to elevate it? Try sprinkling some fresh dill or even a light drizzle of olive oil for a lovely sheen. It’s like a polka-dotted Nordic sweater for your plate!
Serving Suggestions
Pair it alongside some bratwurst or grilled meats. There’s just something about the savory flavor of meats meeting the zippiness of sauerkraut that makes your taste buds dance.
Visual Appeal Tips
Consider using contrasting colors on the plate. A brown bratwurst next to the vibrant green and purple hues of your sauerkraut creates visual interest that’s hard to resist.
Storage and Make-Ahead
Storage Guidelines
Once you’ve hit the fermentation jackpot, it’s crucial to know how to store your creation. You’re gonna want to keep that sauerkraut sealed tightly in your fridge to slow down the fermentation.
Preservation Methods
Homemade sauerkraut can last for months if stored correctly. Just make sure those jars are airtight. Think of them as treasure troves of flavor just waiting for you to pop them open.
Reheating Instructions
Now, if you ever need to reheat, remember to do it gently. A quick warm-up in a pan preserves those good probiotic benefits.
Freshness Tips
A quick note: If you see any discoloration or mold, toss it immediately. Freshness is your best friend, and no one wants an off-note in this symphony of fermented delight.
Creative Variations
Flavor Adaptations
Feeling adventurous? Try adding a few crushed red pepper flakes for a spicy twist, or even some diced apples to sweeten the deal. The beauty of sauerkraut is in its flexibility .
Dietary Modifications
If you're going all plant-based, you’re covered here! This recipe is inherently dairy-free and gluten-free.
Seasonal Twists
Approach summer with a refreshing take—add thin slices of cucumbers for a crisp bite or even some shredded carrots for a splash of color.
Regional Variations
Try incorporating regional spices you love. For instance, a bit of curry powder can lead you down an Indian-inspired path!
Complete Nutrition Guide
Detailed Breakdown
Let’s nerd out a bit—each cup of your sauerkraut packs a whopping 27 calories and is rich in dietary fiber.
Health Benefits
Honestly, the health benefits of sauerkraut are stellar. Probiotics are not just a buzzword; they're essential for gut health, and homemade versions beat store-bought any day.
Dietary Information
Curious about nutrients? With vitamins like C and K, this tangy treat is not just delicious; it’s a health warrior.
Portion Guidance
One cup per serving keeps things balanced. This sauerkraut can complement a meal without overwhelming you.
Expert FAQ Solutions
Common Concerns
A common concern is whether your sauerkraut is fermenting correctly. If it smells sour and has bubbles, you’re on the right track!
Expert Answers
If you’re worried about crunchiness, I learned that the length of fermentation directly impacts the texture, so tailor it to your texture preference.
Troubleshooting Guide
If your kraut becomes too soft, it might have been over-salted. Next time, reduce the salt, or opt for less fermentation time.
Success Tips
Always taste as you go ! You’ll know when it’s just right.
In conclusion, making the coal miner's recipe for sauerkraut in a jar not only connects you with a rich tradition but also showcases the incredible flavor that comes from patience and creativity.
Embrace your inner fermenter and enjoy every tangy, crunchy bite of your journey in the kitchen. happy fermenting!
Coal Miner’s Sauerkraut in a Jar Card
⚖️ Ingredients:
- 2 medium heads of cabbage (about 4-5 pounds total)
- 3 tablespoons kosher salt (non-iodized)
- 1 tablespoon caraway seeds (optional)
- 4 cloves garlic, crushed (optional)
- Filtered water (as needed for rinsing)
🥄 Instructions:
- Step 1: Prepare the Cabbage: Remove the outer leaves of the cabbage and set aside. Cut the cabbages into quarters and remove the core. Slice the cabbage into thin shreds.
- Step 2: Mix Cabbage and Salt: In a large mixing bowl, add the shredded cabbage to the kosher salt. Massage the salt into the cabbage for about 5-10 minutes until it starts to release juices.
- Step 3: Add Flavorings: If using, add the crushed garlic and caraway seeds to the cabbage mixture and mix well.
- Step 4: Pack into Jars: Firmly pack the cabbage mixture into clean glass jars, leaving about 1-2 inches of headspace. Ensure it is submerged in its juices.
- Step 5: Seal the Jars: If using a lid, do not tighten it fully; allow gas to escape. Alternatively, cover with a clean cloth secured with a rubber band.
- Step 6: Fermentation: Place the jars in a cool, dark place (ideally 60-70°F) for fermentation. Check every few days and press down to keep it submerged.
- Step 7: Taste Testing: After one week, begin tasting your sauerkraut. Continue to ferment until it reaches your desired sourness, up to 4 weeks.
- Step 8: Storage: Once fermented to your liking, seal the jars with airtight lids and transfer them to the refrigerator.
Previous Recipe: My Grandmother's 7 Comforting Tips for Dairy-Free Clam Chowder
Next Recipe: Black Label Chocolate Sauce Recipe Bulk Recipe: 7 Best Tips for Rich Flavor