Black Russian Bagel: The Ultimate 10-Minute Recipe for Chewy Delight!
Discover a delicious black russian bagel recipe! Learn how to craft homemade bagels with tips on yeast activation, toppings, and more. Try it today!

- The Ultimate Guide to Mastering Black Russian Bagels
- Why This Recipe Will Amaze You
- Health and Nutrition Highlights
- Recipe at a Glance
- Why Bagels, Anyway?
- Quality Ingredients Breakdown
- Kitchen Equipment Essentials
- Perfect Cooking Technique
- Professional Secrets
- Perfect Presentation
- Storage and Make-Ahead
- Creative Variations
- Complete Nutrition Guide
- Expert FAQ Solutions
- Recipe Card
Have you ever thought about how a simple bagel could carry such deep cultural significance while being totally delicious? honestly, how can something so unassuming turn breakfast into a gourmet experience? that’s exactly what you’re about to discover as we dive into the amazing world of the black russian bagel.
This recipe is a bit of a culinary magician; it takes only 35 minutes from start to finish, with a medium difficulty level that’s totally manageable—even for the kitchen novice! this isn’t just any bagel; it’s a sweet, chewy twist on the classic with flavors that might just blow your mind!
To appreciate what makes the black russian bagel so special, let’s take a little trip down memory lane. bagels have been around since the 16th century, originating in poland and becoming a staple in jewish culture.
They’re practically a rite of passage for anyone who’s ever strolled through a new york deli. but our black russian variation adds a delightful twist with cocoa powder and molasses that sings to your sweet tooth while keeping savory lovers satisfied too.
Not only does this recipe serve up a plateful of chewy, flavorful goodness, but it also gives you a chance to experiment with traditional bagel-making techniques.
If you’ve ever found homemade bagels a bit intimidating, this recipe takes sweet cocoa and melds it with that perfect chewy texture we all crave.
Let’s jump deeper into that rich culinary heritage!
The Ultimate Guide to Mastering Black Russian Bagels
Let's take a moment to appreciate the fascinating origins of the black russian bagel. the roots of this delightful baked good may lie in the traditional bagel but are enriched with flavors that nod to baking cultures across the globe.
The bittersweet cocoa powder—so often overlooked in bagel recipes—adds layers you're not really expecting, but trust me, it works.
From the jewish delis of new york to brunch tables everywhere, bagels are celebrated for their versatility. and let’s be real; these aren’t just breakfast items anymore—they’re brunch headliners, cozy comfort food, and even gourmet party snacks when dressed up with the right toppings.
Why This Recipe Will Amaze You
Now, what’s really going to grab your taste buds with the black russian bagel is the unique flavor combination. the cocoa and molasses create a sweet earthiness that’s just mind-blowing when paired with traditional toppings like cream cheese.
You know, with some poppy and sesame seeds sprinkled on top, it’s almost an art piece!
And the best part? this method is foolproof. it’s been expert-tested (thanks to my late-night kitchen experiments), so you know you’re bound to get that perfect chewy bagel texture if you just follow along.
Want time-saving tips? make a double batch and freeze a few bagels for quick breakfasts later!
Health and Nutrition Highlights
Wondering if these delicious bagels can be health-conscious? you bet! the key nutritional benefits include the protein from the bread flour and the antioxidants you get from the cocoa powder.
Plus, if you choose whole wheat flour, you're upping the fiber game. have dietary considerations? flexibility is the name of the game—switch to a gluten-free bagel recipe or opt for a vegan bagel option by substituting yogurt for the egg wash.
Nourishment doesn’t have to come at the expense of taste, right? Enjoy balanced nutrition with every bite and elevate your breakfast game.
Recipe at a Glance
Ready to roll (and boil!)? this black russian bagel recipe takes just 10 minutes to prep and about 25 minutes to bake, making the total time around 35 minutes.
It’s perfect for those casual brunch days or even a low-key dinner. the skill level is medium, but i promise that you'll impress your friends and family—serving size yields about four bagels, so it’s ideal for a small gathering or a breakfast-for-dinner night.
Why Bagels, Anyway?
Okay, let’s get excited about how we’re going to make these bad boys! the following section will be all about gathering the bagel ingredients.
We'll explore the yeast activation process, how to shape bagels impeccably, and take a deeper look into boiling bagels before baking.
So grab your apron, and let’s start crafting something extraordinary in the kitchen!
Quality Ingredients Breakdown
Hey there, fellow food lovers! today, i want to chat about the star players in our black russian bagel recipe.
You know how much i love homemade bagels, and as someone who’s been through the joys and tribulations (yep, burnt bagel saga, i’m looking at you), i’ve learned a thing or two about picking the right bagel ingredients.
So, grab a cup of coffee, settle in, and let's dive into the nitty-gritty of what makes these bagels truly shine.
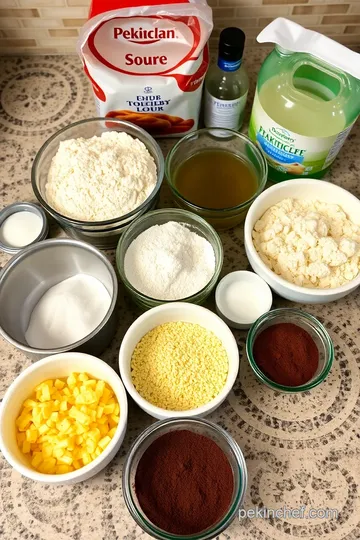
Premium Core Ingredients
Alright, let’s start with the essentials. for our black russian bagels, you'll need 2 cups of all-purpose flour and 1 cup of bread flour.
The reason for this combo? it’s all about that chewy bagel texture! bread flour has more protein, which gives the bagels some extra oomph.
Look for flour that feels refined and not too grainy. if it has a nice, soft feel, you’re good!
When it comes to activating the yeast, you’ll want 1 teaspoon of active dry yeast, 1 tablespoon of sugar, and 1 cup of warm water (anywhere from 110°f to 115°f).
The yeast activation process is crucial — too hot and you’ll kill it, too cold and it won’t awaken. an easy way to check? dip a finger in; it should feel comfortably warm, like a cozy bath.
Add 1 tablespoon of salt and a couple of tablespoons of unsweetened cocoa powder for that rich flavor that gives our black russian bagel its unique twist.
Feel free to sniff that cocoa powder; the aroma is just heavenly. and let’s not forget about the 2 tablespoons of molasses and 1 tablespoon of olive oil that not only add flavor but also keep the bagels nice and moist.
Signature Seasoning Blend
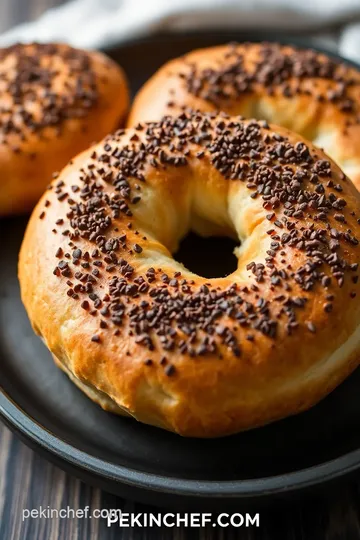
Now, let's talk toppings. for the bagel topping, we’re using a delightful mix of seeds: ¼ cup of poppy seeds and ¼ cup of sesame seeds.
Honestly, these little guys are like the cherry on top, giving a nutty crunch that you just can't resist. as for the egg wash, it’s simple — just whisk one egg in a small bowl.
This helps everything stick and gives those bagels a lovely, glossy finish.
Smart Substitutions
If you find yourself missing an ingredient or two, no sweat! got whole wheat flour laying around? that can replace part of the all-purpose flour in our whole wheat bagel recipe.
For a vegan option, swap out the egg wash for a simple water wash; it won’t be as shiny, but it’ll work just fine.
And if you’re out of molasses, a good alternative is maple syrup or honey — give that sweet twist a go! this is great to think about when you want to craft unique bagel recipes or even try out those sweet bagel variations i adore.
Kitchen Equipment Essentials
Okay, let’s not forget about our trusty kitchen tools! you don’t need a ton, but here are some must-haves. a large mixing bowl for your bagel dough is essential — you're gonna need space.
A good quality spatula or wooden spoon helps for mixing, and don’t skimp on a sharp knife for shaping the bagels.
Now, if you’re like me and enjoy a little gadget magic, consider investing in a kitchen scale. trust me, weighing your ingredients can make such a difference, especially for those precision-loving bakers! also, if you want that perfect chewy texture, a slotted spoon for boiling and a baking sheet lined with parchment paper are absolute musts.
Pro Ingredient Tips
Here’s where i get a little share-y! when selecting your yeast, always check the expiration date. fresh yeast means a successful rise.
Make sure to store any leftover cocoa powder, molasses, or flour in a cool, dry place — my pantry would classify as a fortress now.
If you want to save some bucks, buy your flour in bulk. it’ll help your wallet, and you won't run out mid-scone craving!
And as we wrap this up, i can't stress enough the importance of that boiling step before baking. it gives your black russian bagel that sought-after chewy crust.
So, when you’re ready to tackle the instructions, you’ll have everything you need for bagel bliss.
Now let’s move on to how to shape those bagels and all the little nitty-gritty details that will elevate your baking game.
Are you ready? because your homemade bagels are about to take center stage!
Alright, buckle up, foodie friends! today, we’re diving into the wondrous world of homemade bagels—particularly, the irresistible black russian bagel.
Now, before we get our hands doughy, let’s talk about the journey of making these delightful rounds of goodness. it’s not just about slapping some dough together; it’s a whole vibe.
Trust me, once you figure out the rhythm of boiling before baking, you’ll wonder why you ever spent your mornings on boring store-bought bagels!
Perfect Cooking Technique
Essential Preparation Steps
First off, let’s discuss the magic of mise en place. it’s french for “everything in its place,” and trust me, this is key whether you’re whipping up a fancy dinner or just making bagels at home.
Gather all your ingredients: all-purpose flour, bread flour, active dry yeast, salt, sugar, warm water, cocoa powder, molasses, and olive oil.
A spoon for stirring, a bowl for mixing, some parchment paper for baking, and a pot for boiling—easy peasy.
Now, you’ll want to activate the yeast properly, so grab a small bowl and mix that warm water (110°f to 115°f) with sugar and yeast.
Let it sit until it froths up—about 5-10 minutes. while waiting, whisk together your dry ingredients: flours, cocoa, salt, and molasses in a large mixing bowl.
It’s like prepping for a glorious battle in the kitchen.
When time is up, combine both mixtures, and voila! you’ve got the beginnings of your bagel dough. get ready for some serious kneading action.
.. you’ll want to knead that dough for about 8-10 minutes. it’s like a workout but so much tastier! and then let it rise for about an hour until it's doubled in size like your expectations for brunch with friends.
Professional Cooking Method
Boiling the bagels is a game changer, and here’s the scoop: it gives them that chewy texture we all know and love.
Once your dough is ready and shaped—don’t worry; i’ll tell you how to shape bagels in a bit—you’ll drop them into a pot of gently boiling water, a few at a time, for about a minute or two on each side.
Seriously, it’s like the hot tub for bagels. they deserve it!
Make sure your oven is preheated to 425°f (220°c) while your shaped beauties are rising one last time on the parchment paper.
An egg wash (think of it as a beauty serum for your bagels) brushed on top after boiling amps up that shiny finish.
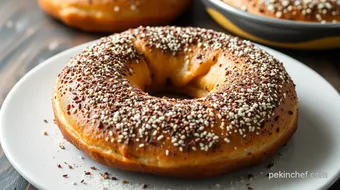
Sprinkle your favorite toppings—poppy or sesame seeds are classics!
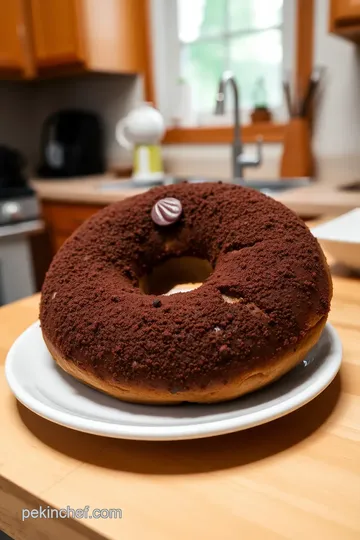
Bake for about 20-25 minutes until they’re beautifully dark and shiny. Pro tip: the bagels are done when they’ve developed a rich brown color.
Expert Techniques
Now, let’s dive deeper into the nitty-gritty, shall we? the yeast activation process is crucial. if you notice the mixture not bubbling, toss it; no dough can rise without happy yeast! when kneading, look for that smooth and elastic feel; you’re aiming for a sticky but workable dough.
When boiling, resist the urge to overcrowd the pot. a happy bagel swims freely, and too many in the pot can lead to clumpy, sad shapes.
Post-boiling, your bagels should feel firm. that’s a good success indicator!
Success Strategies
Now, let’s talk troubleshooting. if your bagels turn out more like bagel rocks, it’s likely from over-kneading or not allowing enough rise time.
Perfect results come from patience, my friend! if you’ve forgotten the egg wash and aren’t feeling the shine, no sweat.
Brush them with olive oil for a little glow.
If you're feeling adventurous, experiment with different flours or even a gluten-free bagel recipe. they’re shockingly versatile! maybe try some sweet bagel variations with dried fruit or even dark chocolate for a treat.
As you craft your unique bagel recipes, remember this moment—it’s about the process, the rich flavors, and the joy spread across the breakfast table.
Sharing these black russian bagels is bound to make your gatherings a little extra special.
Now, if you’re still thirsty for more knowledge on bagel making, whether it’s the best way to store them or how to craft artisan bagels at home, stay tuned for the next section.
It’s all about elevating your bagel game and exploring fun variations—because life is too short for boring breakfast!
Oh, hey there! so, let’s talk about something deliciously fun today: making your own black russian bagels at home. trust me, once you try these, you might just want to ditch the store-bought ones forever.
So buckle up; it’s going to be a tasty ride!
Professional Secrets
So, you want to peek behind the curtain, huh? here’s the scoop from my kitchen escapades. first up, let's talk about yeast.
The yeast activation process is essential for getting that perfect chewy bagel texture. always use warm—not scalding—water to activate your yeast.
Think of it like waking up from a long slumber; you gotta be gentle!
Now, onto mixing those bagel ingredients. i always recommend using a mix of all-purpose flour and bread flour. the latter brings a nice chew and structure, perfect for bagels.
When kneading the dough, aim for that smooth, elastic feel. it’s a workout, but so worth it!
And here’s a little kitchen wisdom: when boiling bagels before baking, ensure your water is just simmering. Too much boiling can be a mess!
Perfect Presentation
Okay, let’s get to the fun part—presentation! have you ever seen a bagel that looked so good you didn’t want to eat it? plating techniques matter, my friend! once those black russian bagels are out of the oven, i love to slice them open and spread cream cheese (herb-flavored is fab, trust me).
Don’t get me started on toppings! poppy and sesame seeds are classic, but feel free to get creative. think about adding everything from fresh herbs to even a drizzle of olive oil.
And remember, presentation is key; a sprinkle of colorful toppings can turn your bagels into an eye-catching brunch centerpiece.
Storage and Make-Ahead
Now, if you’re planning a brunch bash (or just want to enjoy bagels on the weekend), here are some solid storage and make-ahead tips.
Once your freshly baked bagels cool, store them in a paper bag for up to two days at room temperature.
For longer storage, toss those beauties in a freezer bag. you can freeze them for up to three months!
When you're ready to dive in, just reheat in the oven for about 10 minutes at 350°f. the magic of that warmth brings back that homemade feel! honestly, there’s nothing like the smell of warm bagels filling your kitchen.
Creative Variations
This is where the fun kicks in—let’s get creative! want a sweet bagel variation? add in some dried fruit or dark chocolate chips.
Oh, yum! for a heartier option, consider my whole wheat bagel recipe. you could even go the vegan route by subbing out the egg wash for a diy mix of non-dairy milk and a sprinkle of nutritional yeast.
And don’t forget the seasonal twists! Pumpkin spice in fall, perhaps? Or, think about using seasonal fruits as toppings. It’s not just a meal; it's a canvas!
Complete Nutrition Guide
I know, nutrition isn’t the most exciting topic, but hear me out! your homemade black russian bagels pack a punch.
Each bagel offers around 210 calories, 5 grams of protein, and 2 grams of fiber. the earthy flavor of cocoa powder and the richness from molasses alternatives not only add depth but also contribute to a satisfying meal.
Remember portion guidance: if you’re having a big brunch, serving one bagel per person is usually perfect alongside some fruit or salads. Balancing is key here!
Expert FAQ Solutions
Let’s tackle common concerns. Ever wonder why your bagels didn’t rise? Check that yeast! If it’s too old or activated with water that’s too hot, you’ll end up with sad, flat dough.
Another popular question i get: “can i make these gluten-free?” absolutely! just swap out regular flour with a gluten-free blend, and they’ll still come out fantastic! and if you’re craving chewy bagel texture, don’t skimp on the boiling step.
It’s crucial for that classic taste we all love.
So there you have it, my friend. making black russian bagels at home is totally doable, and honestly, so rewarding! whether you’re hosting a brunch or just treating yourself to some comfort food recipes, these bagels will impress—and taste incredible too.
Grab your ingredients, roll up those sleeves, and dive into the wonderful world of bagel-making. you won't regret it!
Black Russian Bagel: The Ultimate 10-Minute Recipe for Chewy Delight! Card
⚖️ Ingredients:
- 2 cups all-purpose flour
- 1 cup bread flour
- 1 teaspoon active dry yeast
- 1 teaspoon salt
- 1 tablespoon sugar
- 1 cup warm water (110°F to 115°F)
- 2 tablespoons unsweetened cocoa powder
- 2 tablespoons molasses
- 1 tablespoon olive oil
- ¼ cup poppy seeds
- ¼ cup sesame seeds
- 1 egg (for egg wash)
🥄 Instructions:
- Step 1: In a small bowl, combine warm water, sugar, and yeast. Let it sit for about 5-10 minutes until frothy.
- Step 2: In a large mixing bowl, whisk together the all-purpose flour, bread flour, salt, cocoa powder, and molasses until well combined.
- Step 3: Pour the activated yeast mixture and olive oil into the dry ingredients. Using a spoon, mix until a shaggy dough forms.
- Step 4: Transfer the dough to a floured surface and knead for 8-10 minutes until it becomes smooth and elastic.
- Step 5: Place the dough in a lightly oiled bowl, cover it with a damp cloth, and let it rise in a warm place for about 1 hour or until doubled in size.
- Step 6: Once the dough has risen, punch it down to release any air. Divide the dough into 4 equal pieces. Roll each piece into a ball, then poke a hole in the center with your finger and gently stretch it into a bagel shape.
- Step 7: Place the shaped bagels on a parchment-lined baking sheet, cover, and let them rise for another 30 minutes.
- Step 8: During the second proof, preheat the oven to 425°F (220°C).
- Step 9: Bring a large pot of water to a gentle boil. Carefully drop each bagel into the boiling water (1-2 at a time) for about 1-2 minutes on each side.
- Step 10: After boiling, place the bagels back on the baking sheet. In a small bowl, whisk the egg to create an egg wash and brush it over each bagel. Sprinkle the poppy and sesame seeds evenly over the top.
- Step 11: Bake in the preheated oven for approximately 20-25 minutes, or until the bagels are dark brown and shiny.
- Step 12: Remove from the oven and allow to cool on a wire rack. Enjoy fresh or toasted!
Previous Recipe: Ultimate pumpkin veloute: 10 Easy Steps to Heavenly Comfort!
Next Recipe: Guanabana Fruit Drink: 5 Easy and Refreshing Tropical Elixirs!