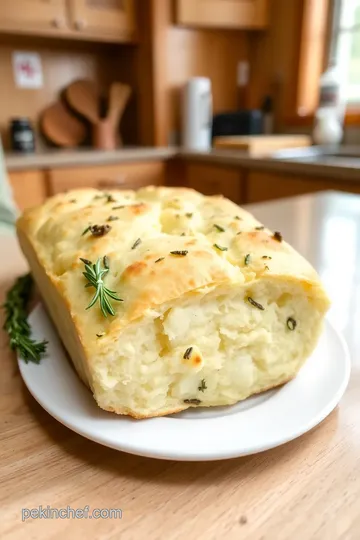
Delicious Garlic & Rosemary Focaccia Bread
Craving homemade bread? This Garlic & Rosemary Focaccia Bread recipe is my go-to! It’s easy, aromatic, and perfect for dipping—let's bake together!

- Let’s look into Into Deliciousness: Bake Focaccia Bread: Delicious Garlic & Rosemary
- Essential Ingredients Guide
- Nail Your Focaccia: The Professional Cooking Method
- Pro Tips & Secrets for Baking the Best Focaccia
- Perfect Presentation: Make it Pop!
- Storage & Make-Ahead
- Creative Variations: Mix It Up!
- Complete Nutrition Guide: What’s Inside
- Expert FAQ Solutions: Your Questions Answered
- Wrap Up: Unleash Your Inner Baker!
- Recipe Card
Let’s look into Into Deliciousness: Bake Focaccia Bread: Delicious Garlic & Rosemary
Oh my gosh, have you ever had one of those days where you just need a warm slice of bread that’s fluffy, flavorful, and downright comforting? honestly, nothing beats the aroma of freshly baked focaccia wafting through the kitchen! i remember the first time i made focaccia bread.
I was so intimidated by the process, thinking it was reserved for fancy italian restaurants. but let me tell you, if i can do it, you definitely can! this is why i want to share my go-to recipe: bake focaccia bread: delicious garlic & rosemary .
Trust me; your taste buds will thank you!
A Slice of History: What’s Focaccia Anyway?
So, what’s the deal with focaccia? this iconic italian flatbread has been around since ancient times. legend has it that the roman soldiers used to cook a version of focaccia over an open flame during their campaigns! fast forward to today, and it’s become a staple in italian cuisine.
People whip up this garlic-infused bread for everything from dinner parties to casual weeknight dinners. and guess what? it’s especially popular now with the rise of rustic italian cooking vibes trending on pinterest.
Now, let’s chat about the logistics for a sec. making this homemade focaccia takes about 1 hour and 10 minutes , which includes some time for the dough to chill out and rise (like we all need sometimes, right?).
Don’t sweat the difficulty; it's easy-peasy! if you can mix ingredients together, you’ve got this in the bag! plus, the cost is super low, making it a wallet-friendly culinary adventure.
Why Bake Focaccia?
Alright, let’s break down why you should make this garlic and rosemary bread . first off, it’s loaded with health benefits .
Think about it; it’s made with simple, wholesome ingredients. that warm olive oil you drizzle over? super healthy fats! and garlic is known for its immune-boosting powers.
Seriously, this bread checks all the boxes for a mediterranean diet .
Now, let’s face it: nothing pairs better with soups or salads than a slice of homemade focaccia . you’ve got a nice crust on the outside, and when you bite in, it’s soft, airy, and dimpled just right.
You could dunk it in marinara, slather it with butter, or just enjoy it plain. perfect for italian appetizers or even a buffet-style dinner.
It's also a grab-and-go snack—tell me that’s not a win!
But wait, there’s more! this recipe shines during special occasions, whether it’s family gatherings, picnics, or holiday feasts. the kids will love helping with the focaccia toppings too—picture a diy focaccia night where everyone adds their favorite herbs or veggies.
How fun is that?
Your Next Culinary Adventure Awaits!
If you’re anything like me, you’re now ready to hop into the kitchen. making bake focaccia bread: delicious garlic & rosemary opens up a world of flavor.
This is more than just bread; it’s a centerpiece, a conversation starter, and a slice of comfort. i promise you’ll want to whip this up again and again, with all sorts of gourmet focaccia ideas in mind.
So, gather your kitchen baking essentials and let’s get started!
What You Need: The Ingredients Countdown
Ready to see what goes into this mouthwatering focaccia? Prepare to be amazed at how simple this is. Up next, we’ll dive into the list of ingredients you'll need to create this culinary masterpiece that'll get everyone asking for your recipe! Get your measuring cups and friends ready, and let’s make some magic happen!
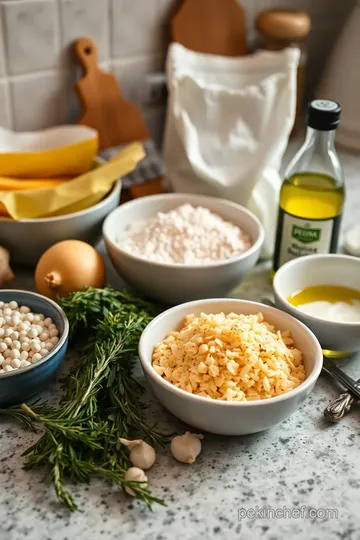
Essential Ingredients Guide
When it comes to baking, especially when you want to bake focaccia bread: delicious garlic & rosemary , understanding your essential ingredients is key.
Let’s break this down so you’re always set up for success in the kitchen!
Premium Core Components
First things first, let’s talk about premium core components .
-
Detailed measurements : you’ll need about 4 cups (500g) of all-purpose flour and 1 ¾ cups of warm water. if you’re more metric-inclined, that’s about 42° c for the water.
Make sure to keep those numbers handy!
-
Quality Indicators : Look for fresh yeast that’s crumbly and smells yeasty (not musty, yikes!). Flour should be finely milled and free from lumps.
-
Storage guidelines : store your flour in a cool, dark place. it can last about 6-12 months in the pantry, and even longer in the fridge.
Fresh herbs like rosemary should be kept in the fridge and used within a week .
-
Freshness Tips : Always smell your dried spices or herbs to check for freshness. If they have no aroma, it’s time to toss them!
Signature Seasoning Blend
Now, let’s spice things up with a signature seasoning blend .
-
Essential Spice Combinations : For that Italian vibe , some garlic powder and dried oregano can elevate your bread.
-
Herb Selections : Fresh rosemary is your best buddy here—but if you’re in a pinch, dried can work too! Just use a bit less (about 1 teaspoon).
-
Flavor Enhancers : Try drizzling some olive oil before baking—such a game changer! That rich flavor takes your bread to another level.
-
Regional Variations : Feel free to explore! Basil and thyme can really give a Celtic twist to this classic bread.
Smart Substitutions
We all know life doesn’t always go as planned. That’s where smart substitutions come in.
-
Common Alternatives : Don't have all-purpose flour? Whole wheat will do! It adds a nice nutty flavor.
-
Dietary Modifications : For a gluten-free version, look for a 1:1 gluten-free baking mix. It’s a simple switch!
-
Emergency Replacements : Out of fresh garlic? A garlic-infused oil can add that nice kick.
-
Seasonal Options : If it’s summer, throw in some zucchini for a nice blend or even cherry tomatoes for that sweet bite.
Kitchen Equipment Essentials
Next up, your kitchen equipment essentials . Don't worry, this is the easy part!
-
Must-Have Tools : A good mixing bowl and a baking sheet are all you really need! But a pizza cutter can make slicing much quicker.
-
Alternative Equipment Options : Don’t have a baking sheet? Use a cast-iron skillet instead—it will give your focaccia a lovely crisp finish.
-
Preparation Tips : Make sure to prep your baking surface with a good layer of oil. This keeps your focaccia from sticking!
-
Storage Solutions : Let your focaccia cool on a wire rack but keep it covered with a towel to maintain moisture if you're not diving in right away.
Now, with all these helpful tips and essential ingredients, you’re ready to embark on making your delicious garlic & rosemary focaccia ! it's all about taking it step by step—trust me, once you start, you’ll realize how easy and rewarding baking can be.
Next up? I’ll guide you through the step-by-step instructions to ensure your bread turns out fluffy and flavorful every single time!
Nail Your Focaccia: The Professional Cooking Method
Hey there, fellow foodies! if you’ve ever wanted to whip up a plate of homemade focaccia that makes everyone at your dinner table swoon, you're in the right spot.
Today, we’re diving into how to bake focaccia bread: delicious garlic & rosemary like a pro. trust me, it's easier than you think.
Let’s break it down!
Essential Preparation Steps
Getting everything set before you start cooking is like having a secret weapon in the kitchen.
Mise en place means having your ingredients prepped and ready to go. for focaccia, you’ll want 4 cups of flour, 2 teaspoons of instant yeast, and a couple of garlic cloves chopped.
You know, just try not to chop a fingernail with it!
Time management is crucial. Keep an eye on the clock, especially for that second rise. Set a timer! It's the difference between a fluffy focaccia and a flat disappointment.
Next up is organization . lay out your tools - mixing bowls, baking sheets, all that jazz. you’ll thank yourself later! and speaking of thanking yourself, keep safety in mind.
Don’t rush around in the kitchen and keep that garlic-infused oil away from your face – it burns!
Step-by-Step Process
Now, let’s make your focaccia come to life. Follow these steps like you’re trying to win a baking show:
-
Make the dough: in a large bowl, stir together flour, yeast, and salt . gradually mix in 1 ¾ cups of warm water until it forms a shaggy dough.
Seriously, don’t worry about it being perfect!
-
Knead and rise: pop that dough onto a floured surface for about 2 minutes . just a quick knead will do! then, cover it and let it rise for 30 minutes .
It's like giving it a little nap.
-
Prepare for Baking: While waiting, preheat your oven to 425° F ( 220° C) . You want that hot oven for the perfect crust.
-
Shape and add toppings: transfer the dough to a greased baking sheet. stretch it out with your fingertips (dimple it really good!).
Then, drizzle with olive oil, sauté that garlic until it’s fragrant, and pour it over the top. sprinkle with chopped rosemary and flaky sea salt.
Heaven!
-
Second Rise and Bake: Give it another 15 minutes to rise a bit more while waiting for the oven. Then, bake for 20- 25 minutes until golden brown.
-
Serve: Let it cool for a few minutes before slicing. You’re gonna want to dive in right away!
Expert Techniques
Now, let’s talk like a professional. Here are a few tips that’ll take your focaccia to the next level:
Quality Checkpoints: Always use fresh ingredients. Trust me, stale rosemary just won’t cut it. And check your dough! If it’s not doubling in size, something’s off.
Troubleshooting tips: if your initial rise isn’t successful, it might be the temperature of your water (it should be around 100- 110° f ).
Your yeast needs warmth, not a freezing cold bath.
Success Strategies
Ok, let’s address common foe number one: mistakes. avoid overmixing – you want this dough to be forgiving. rushing the rise is another biggie.
Good things take time, like your focaccia to puff up beautifully.
For quality assurance , do the "poke test" - if it springs back when poked, it’s ready. and for those of you who want to plan ahead, make it a make-ahead option .
You can prep your dough two days in advance and stick it in the fridge!
Embrace Italian Cuisine at Home
Having gone through all this, remember the joy of baking your own artisan focaccia . Diving your bread into a rich marinara or pairing it with a fresh salad is what the Mediterranean diet is all about!
I can assure you, that perfect garlic and herb bread will become your go-to recipe for any occasion, whether you’re hosting friends or just craving a comforting snack.
Ready to elevate your focaccia games? Keep those baking techniques in your back pocket. Trust me, your friends will be calling you the next Italian bread expert at the next potluck!
Next up: Additional Information...
Pro Tips & Secrets for Baking the Best Focaccia
You know, there’s something magical about baking bread at home. it fills the house with warmth and that mouth-watering aroma you just can’t resist.
When making bake focaccia bread: delicious garlic & rosemary , it’s all about those little secrets that take this from “good” to “mind-blowing.
”
First off, don’t skimp on the ingredients . use high-quality olive oil , and if you can snag some fresh rosemary from your local farmer’s market, do it! fresh herbs amp up the flavor.
When cooking, i learned to follow my gut; fresh ingredients speak louder than anything else.
For time-saving tricks , consider using instant yeast. It’s a game-changer! You skip the proofing stage and go straight to mixing. Boom! Less time but all the fluffy focaccia goodness you crave.
Now, flavor enhancement? that’s where the fun starts. try infusing your olive oil with garlic beforehand. just heat it gently, and you’ll have a luscious oil that takes your dough to another level.
You’ll feel like a gourmet chef with this little hack!
When it comes to plating, presentation matters, my friends! so get creative. drizzling a bit of that infused oil over the hot focaccia right before serving? «chef's kiss!» it transforms your homemade focaccia into a rustic italian masterpiece.
Everyone loves a good instagram moment, right?
Perfect Presentation: Make it Pop!
Focaccia is more than just delicious ; it should be eye-catching too! Want to wow your friends with your baking skills? Here are some tips.
For plating techniques, slice your focaccia into generous squares and arrange them on a wooden board. Scatter fresh leaves of rosemary on top for a pop of color.
Speaking of colors, think about your garnishes . maybe some cherry tomatoes? or olives? you could dollop a bit of homemade pesto or marinara sauce right in the center for dipping! these little touches are what you’d find in any upscale italian eatery.
Storage & Make-Ahead
So, you’ve baked a glorious loaf and devoured half of it. what do you do with the leftovers? store them properly, my friend! wrap your focaccia in plastic wrap or stow it in an airtight container.
It’ll last about 3 days at room temperature.
If you want it to last longer, consider freezing it. just slice it first, wrap each piece snugly, and toss it in the freezer.
When you’re ready to enjoy, pop it in the oven at 350° f ( 175° c) for about 10 minutes, and it’s like you just baked it fresh again!
Creative Variations: Mix It Up!
The beauty of focaccia is you can play with flavors. want to break the mold? top your focaccia with caramelized onions or roasted garlic.
It’s one of those easy bread recipes that welcome creativity!
If you’re looking to cater to different diets, switch it up! going vegan? leave out the cheese and opt for a vegan-friendly, herb-infused oil.
Why not try making a whole wheat focaccia ? it'll boost the nutritional value while keeping the flavor!
Complete Nutrition Guide: What’s Inside
Counting calories? this focaccia recipe is surprisingly light on the waistline. with around 210 calories per serving , it packs some punch without breaking the belt.
The garlic and rosemary add not just flavor, but also health benefits like anti-inflammatory properties.
Expert FAQ Solutions: Your Questions Answered
A common question i hear: “what if my dough doesn’t rise?” a couple of reasons could be at play. either your yeast is old, or maybe your water was too hot and killed it.
Think of it as a lesson learned. easy fixes can save your bread!
Feeling confused? Don’t be! Breadmaking is a dance of trial and error. With these tips, you’ll be kicking those jitters to the curb.
Wrap Up: Unleash Your Inner Baker!
So, there you have it! with bake focaccia bread: delicious garlic & rosemary , you’re not just cooking; you’re creating something special.
Whether you’re enjoying it with a family dinner or sharing it at a potluck, every bite tells a story.
Go ahead, roll up those sleeves, and have fun with it! Your friends will be begging for the recipe, and you’ll feel like a superstar. Happy baking!

Delicious Garlic & Rosemary Focaccia Bread Card

⚖️ Ingredients:
- 4 cups all-purpose flour (500g)
- 2 teaspoons instant yeast (7g)
- 1 ½ teaspoons salt
- 1 ¾ cups warm water (42°C)
- ¼ cup olive oil (60ml), divided
- 4 cloves garlic, thinly sliced
- 1 tablespoon fresh rosemary, chopped (or 1 teaspoon dried)
- Flaky sea salt, to taste
🥄 Instructions:
- Step 1: In a large bowl, combine the flour, instant yeast, and salt.
- Step 2: Gradually add warm water to the dry ingredients, mixing until a shaggy dough forms.
- Step 3: Transfer the dough to a lightly floured surface and knead briefly, about 2 minutes.
- Step 4: Place the dough in a lightly greased bowl, cover with plastic wrap, and let rise for about 30 minutes.
- Step 5: Preheat the oven to 425°F (220°C).
- Step 6: Grease a baking sheet with 2 tablespoons of olive oil and transfer the risen dough onto the sheet.
- Step 7: Gently stretch the dough using your fingertips to fit the baking sheet, creating dimples across the surface.
- Step 8: In a small pan, heat the remaining olive oil and sauté the garlic until fragrant.
- Step 9: Pour the garlic oil over the dough, sprinkle with chopped rosemary and flaky sea salt.
- Step 10: Let the dough rise for another 15 minutes while the oven preheats.
- Step 11: Bake in the preheated oven for 20-25 minutes until golden brown.
- Step 12: Allow the focaccia to cool for a few minutes before slicing. Serve warm or at room temperature.
Previous Recipe: How to Bake Salmon with Zesty Lemon & Herbs: A Delicious Family Favorite!
Next Recipe: How to Make Juicy & Flavorful Boiled Chicken Thighs - Easy & Comforting